Posted by admin on September 21, 2008 under Tech Tips | 
WARNING! THIS POST HAS BEEN MARKED AS OUTDATED!
While there may be useful information still contained within the article, there may be other more relevant articles out on the Internet. Please pay close attention to version numbers of software that this article refers to. If you’re not careful, you could break your system if you do not understand what you are doing. If you would like to see this article updated, please contact the site administrator using the Contact page. Thanks!
UPDATE (12/13/2009):The latest versions of VirtualBox 3 have made great improvements in their guest networking options. It is now possible to natively bridge and NAT multiple guests behind a single virtual interface. The suggestions on this post still work fairly well, so I will leave it up as there is a great deal of useful information that come in handy in some scenarios. Please refer to the latest VirtualBox documentation for more help on using their native networking options.
ORIGINAL: Here’s a detailed tutorial on VirtualBox host interface networking with NAT for multiple guests. I typically run a number of guests simultaneously for labs and product testing, so they all need internet access through my host, as well as full communication directly with each other.
The built in NAT interface of VirtualBox isn’t very flexible for what we want to do, so here’s a summary what what we will do. We’ll create three TAP interfaces, one for each guest, since TAP interfaces cannot be shared by multiple guests. These interfaces will serve as each guest’s default gateway, but all of the guests will use the same address space and subnet mask. For full communication between the guests, we’ll add appropriate host routes and enable proxy ARP on the host. Nothing will need to be configured on the guests accept for their IP address, subnet mask, default gateway, and DNS if needed.
Here’s a diagram of the virtual topology, which hopefully will make things a little more clear.
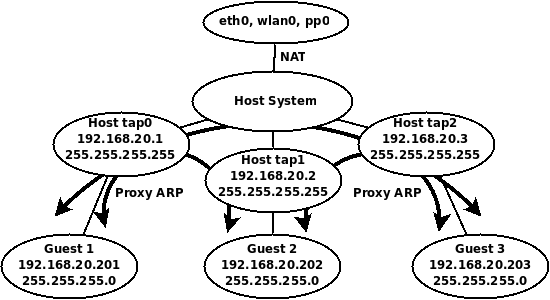
VirtualBox Host Interface NAT Topology
Getting Started
You’ll need to install the User Mode Linux utilities first, if you have done so already.
sudo apt-get install uml-utilities
TAP interfaces
Let’s create three TAP interfaces.
sudo tunctl -u $USER
sudo tunctl -u $USER
sudo tunctl -u $USER
Assign IP addresses to the TAP interfaces.
sudo ip addr add 192.168.20.1/32 dev tap0
sudo ip addr add 192.168.20.2/32 dev tap1
sudo ip addr add 192.168.20.3/32 dev tap2
sudo ip link set tap0 up
sudo ip link set tap1 up
sudo ip link set tap2 up
Routing Requirements
Enable routing and add host routes for each of the guest IP addresses.
sudo sysctl net.ipv4.ip_forward=1
sudo route add -host 192.168.20.201 dev tap0
sudo route add -host 192.168.20.202 dev tap1
sudo route add -host 192.168.20.203 dev tap2
Proxy ARP
Enable proxy ARP on all TAP interfaces so that all the guests can communicate with each other.
sudo sysctl net.ipv4.conf.tap0.proxy_arp=1
sudo sysctl net.ipv4.conf.tap1.proxy_arp=1
sudo sysctl net.ipv4.conf.tap2.proxy_arp=1
Notice, it is NOT necessary to enable proxy ARP on the public interface, since we will be using NAT for guests to access the public network and internet.
NAT Configuration
First flush all iptables rules and enable NAT on the public interface.
sudo iptables --flush
sudo iptables -t nat --flush
sudo iptables -t nat -A POSTROUTING --out-interface eth0 -j MASQUERADE
sudo iptables -A FORWARD --in-interface tap0 -j ACCEPT
sudo iptables -A FORWARD --in-interface tap1 -j ACCEPT
sudo iptables -A FORWARD --in-interface tap2 -j ACCEPT
Now it’s just a matter of configuring each of your guests to use the appropriate host interface as shown in the screenshot below.

After assigning the guest to an interface, configure the guest operating system with the appropriate IP address and routing information. The following list will show the IP address configuration each guest should use for this example.
Guest 1
Host interface: tap0
IP Address: 192.168.20.201
Subnet Mask: 255.255.255.0
Gateway: 192.168.20.1
DNS: Any reachable DNS server.

Guest 2
Host interface: tap1
IP Address: 192.168.20.202
Subnet Mask: 255.255.255.0
Gateway: 192.168.20.2
DNS: Any reachable DNS server.

Guest 3
Host interface: tap2
IP Address: 192.168.20.203

Subnet Mask: 255.255.255.0
Gateway: 192.168.20.3
DNS: Any reachable DNS server.
And that’s it. Your guests should all be able to ping each other, and access the internet!
To make things easy, I have also created the following Bash shell script that creates and tears down the environment with ease. Modify settings to your liking.
#!/bin/bash
# tap-setup.sh
# By Gilbert Mendoza

# Change username accordingly
USER="gmendoza"
PROXY="tap0 tap1 tap2"
TAPS="tap0 tap1 tap2"
NAT_OUT="eth0 wlan0"

ip_setup(){
ip addr add 192.168.20.1/32 dev tap0
ip addr add 192.168.20.2/32 dev tap1
ip addr add 192.168.20.3/32 dev tap2
route add -host 192.168.20.201 dev tap0
route add -host 192.168.20.202 dev tap1
route add -host 192.168.20.203 dev tap2
}

nat_setup(){
iptables --flush
iptables -t nat --flush
for i in $NAT_OUT
 do
   iptables -t nat -A POSTROUTING --out-interface $i -j MASQUERADE
done
for i in $TAPS
 do
   iptables -A FORWARD --in-interface $i -j ACCEPT
done
}

tap_up(){
tunctl -u $USER
tunctl -u $USER
tunctl -u $USER
sysctl net.ipv4.ip_forward=1
for i in $PROXY
 do
   sysctl net.ipv4.conf.$i.proxy_arp=1
done
for i in $TAPS
 do
   ip link set $i up
done
}

tap_down(){
sysctl net.ipv4.ip_forward=0
iptables --flush
iptables -t nat --flush
for i in $PROXY
 do
   sysctl net.ipv4.conf.$i.proxy_arp=0
done
for i in $TAPS
 do
   tunctl -d $i
done
}

if [[ $EUID -ne 0 ]]; then
  echo "This script must be run as root" 1>&2
  exit 1
else

case "$1" in

start)
	tap_up
	ip_setup
	nat_setup
	;;
stop)
	tap_down
	;;
*)
	echo "Usage: $0 {start|stop}"
	;;
esac

fi

exit 0
|
Using it is as simple as the following.
sudo tap-setup.sh start
sudo tap-setup.sh stop
Posted by admin on September 20, 2008 under Tech Tips |
Introduced first in Ubuntu 8.04, UFW is Ubuntu’s “uncomplicated firewall”, a remarkably easy to use tool for creating simple iptables firewall rules. The goal behind UFW is to make it easy for administrators and even third party packages to work with firewall rules in a clean and consistent manner. When UFW is enabled, the default set of rules work very well for the average server or desktop platform, as it blocks all non-essential inbound network access without hobbling certain types of useful protocols and return traffic.
In the following example, we will set up a very simple firewall adequate for almost anyone.
First, let’s check the status of UFW, and the currently installed iptables rule set. The following displays that UFW is disabled and that there are no rules for iptables INPUT chain.
Check firewall status
sudo ufw status
Firewall not loaded

sudo iptables -L INPUT -n | column -t
Chain             INPUT  (policy  DROP)
target            prot   opt      source     destination
Enable UFW
Now, let’s enable UFW and examine the change to iptables’ INPUT chain.
sudo ufw enable
Firewall started and enabled on system startup

sudo iptables -L INPUT -n | column -t
Chain             INPUT  (policy  DROP)
target            prot   opt      source     destination
ufw-before-input  all    --       0.0.0.0/0  0.0.0.0/0
ufw-after-input   all    --       0.0.0.0/0  0.0.0.0/0
The default policy was changed to drop all traffic, and two new chains are referenced. For a much better understanding of what the default rules are, take a look at the files “/etc/ufw/before.rules” and “/etc/ufw/after.rules“.
Connection Tracking
For your convenience, UFW also enables some very useful connection tracking rules, which intelligently inspect outbound application traffic and dynamically allows the return traffic for you. By default, TCP, UDP, FTP and IRC connection tracking modules are loaded, but others may be added to the IPT_MODULES variable in the file “/etc/default/ufw“.
For example, I sometimes need to use TFTP for sending and receiving firmware to and from routers. So I typically add “nf_conntrack_tftp” to the variable IPT_MODULES.
IPT_MODULES="nf_conntrack_ftp nf_nat_ftp nf_conntrack_irc nf_nat_irc nf_conntrack_tftp"
Remember to reload UFW so that the conntrack module is loaded.
sudo /etc/init.d/ufw restart
Allowing inbound services
If your system runs server applications such as DNS, SSH, TFTP and web, then you can add them to your firewall rules using these very simple commands. If you don’t run servers on your machine, this step can be skipped.
sudo ufw allow 53
sudo ufw allow 22/tcp
sudo ufw allow 69/udp
sudo ufw allow 80/tcp
Notice that the first command I used did not specify UDP or TCP. When omitted, UFW adds both protocols. DNS uses TCP for larger DNS exchanges like zone transfers and huge replies, so you’ll probably want both.
UFW displays the results very nicely.
sudo ufw status
Firewall loaded


To                         Action  From
--                         ------  ----
53:tcp                     ALLOW   Anywhere
53:udp                     ALLOW   Anywhere
22:tcp                     ALLOW   Anywhere
69:udp                     ALLOW   Anywhere
80:tcp                     ALLOW   Anywhere
SYN cookies and more
UFW can be used to load kernel options, too. These are defined in “/etc/ufw/sysctl.conf“. For example, I wanted to enable SYN cookies which was added to thwart certain TCP DoS attacks. Modify the following line to 1 in order to enable the feature.
net/ipv4/tcp_syncookies=1
Logging can suck
Okay, if you’re on a busy network and don’t want to fill up your syslog, you might want to disable UFW’s logging.
sudo ufw logging off
And really that’s all there is to it. Be sure to check out the man page for some more examples and features you may be interested in.
Posted by admin on September 12, 2008 under Tech Tips |
WARNING! THIS POST HAS BEEN MARKED AS OUTDATED!
While there may be useful information still contained within the article, there may be other more relevant articles out on the Internet. Please pay close attention to version numbers of software that this article refers to. If you’re not careful, you could break your system if you do not understand what you are doing. If you would like to see this article updated, please contact the site administrator using the Contact page. Thanks!
UPDATE (12/13/2009): The latest versions of VirtualBox 3 have made great improvements in their guest networking options. It is possible to natively bridge guests over your hosts wireless connection “out of the box”, even allowing guests bridge over wireless with DHCP. The suggestions on this post still work fairly well, and will be left up as it has bits of information that is still useful in some scenarios. Please refer to the latest VirtualBox documentation for more help.
ORIGINAL: In the following instructions, we’ll explore a couple of methods on how to let your VirtualBox guest use the DHCP services of your host’s wireless network.
In a previous post, I outlined how to bridge a VirtualBox guest across the wireless connection of your host. But the process involved using static IP’s for your guest, because unlike a true bridge, your host is actually acting as a router, forwarding only unicast packets between the two networks. This complicates your guests ability to use DHCP, since broadcasts are typically not forwarded by routers. I’m going to demonstrate two methods that work around this limitation. For the first method, we’ll be using two different DHCP relay agents. For the second method, we’ll simply use a Broadcast Relay Agent.
Network Assumptions
I’m going to assume we’re using a very simple setup typical to most small networks and wireless routers. Feel free to adjust the following values according to your own requirements.
Wireless Network ID: 192.168.1.0/24
Wireless Network DHCP Range: 192.168.1.2-100
Wireless Network DHCP Server: 192.168.1.1
Host Computer Wireless Interface: wlan0 (change accordingly)
Host Computer Wireless IP: Any IP (Doesn’t matter; You can use DHCP or static)
Host Computer TAP Interface IP: 192.168.1.150/32 (choose something outside DHCP range)
Guest Computer IP: DHCP/Dynamic
Getting Started
Enable IP forwarding on your host.
sudo sysctl net.ipv4.ip_forward=1
Install the User Mode Linux utilities, for the tunctl application.
sudo apt-get install uml-utilities
Create a TAP interface and give it a static IP address in the same address space as your wireless network.
sudo tunctl -u $USER
sudo ip addr add 192.168.1.150/32 dev tap0
sudo ip link set tap0 up
The IP address you choose for the TAP interface should be outside the DHCP range to prevent conflicts with other hosts. It’s very important that you don’t use the same subnet mask as your wireless interface, because you can run into unpredictable routing behavior on your host. I recommend using a 32-bit subnet mask as it is very clean and efficient. I like to use the ipcommand, but feel free to use ifconfig to accomplish the same thing.
Proxy ARP Required
Unlike in the previous post, unless you are reserving an IP address for your guest on the DHCP server, you may not know what IP address your guest will receive. In order for kernel based proxy ARP to work, you would need to manually add the assigned IP address to your routing table.
So to make things easy for you, parprouted comes to the rescue.
sudo apt-get install parprouted
When you run parprouted, it inspects ARP traffic on both sides of the network and adds IP addresses as host routes in the routing table. Run this command in one terminal so you can check out what’s happening in the background.
sudo parprouted -d wlan0 tap0
Method 1: DHCP Relay Agent
DHCP Relay Agents are commonly used on routed networks with centralized DHCP services. The relay agent is a service that is typically configured on a router and converts DHCP broadcasts into unicast messages directed at the DHCP servers IP address. For more detailed explanations on the matter, check out RFC 3046 and 1542.
Simon Kelley’s DHCP Helper (Option A)
I selected to discuss Simon Kelley’s DHCP Helper first because it really is a brilliantly simple and intuitive application. The primary advantage it has over ISC’s DHCP Relay is that you do not have to configure the application with the IP address of the DHCP server. You simply tell dhcp-helperwhich interface on which you want it to automatically discover the dhcp server via broadcast, and it does the rest for you!
Install dhcp-helper from your repositories, or download the latest source code here.
sudo apt-get install dhcp-helper
The service starts on installation automatically, listening on interface eth0. You’ll want to configure it in the file /etc/default/dhcp-helper. I am adding “-i wlan0” because by default it will listen on all other interfaces as well. This way, we limit the test to your VirtualBox guest.
DHCPHELPER_OPTS="-b wlan0 -i tap0"
Restart the service.
sudo /etc/init.d/dhcp-helper restart
Configure your VirtualBox guest to use tap0 as it’s network interface, and watch it pull an IP address from your DHCP server!
ISC’s DHCP Relay (Option B)
First of all, if you would rather use ISC’s DHCP Relay, you must remove dhcp-helper discussed in the previous section. It’s not as transparent as dhcp-helper, so I’m just mentioning it here for the sake of completeness.
Ubuntu and Debian repositories provide ISC’s DHCP relay agent in the dhcp3-relay package. For other distros, check your repositories accordingly.
sudo apt-get install dhcp3-relay
The installer will prompt you to add the IP address of your DHCP server and the interface you wish to listen on, etc. Simply leave them blank for now, as for this example, we’ll be testing things out from a command line. To test things out, run the following command from a separate terminal window, where the IP address is that of your DHCP server.
sudo dhcrelay3 -d -i wlan0 -i tap0 192.168.1.1
Configure your VirtualBox guest to use tap0 as it’s network interface, and watch it pull an IP address from your DHCP server!
Method 2: Broadcast Relay
Okay, so I’d love to take the credit for this one, but a reader from a previous post, Nick Knight, pointed me to a utility called bcrelay. Now this application is cool! It totally mitigates the need for a DHCP relay agent (so kill that process if you are running it), as bcrelay simply rewrites the layer-2 header and forwards broadcast messages between network interfaces. In the case of DHCP, the source MAC address of the packet is changed to your host machines address, but the DHCP header is untouched. So the DHCP server will still offer a brand new IP address to the guest.
Install and run the application from a separate terminal window. As a reminder, you still need to use parprouted though in another window.
sudo apt-get install bcrelay
sudo bcrelay -i tap0 -o wlan0
Configure your VirtualBox guest to use tap0 as it’s network interface, and watch it pull an IP address from your DHCP server!
Troubleshooting
If you really want to see all the action, use wireshark or tcpdump to inspect traffic. The following capture filter works well, in two separate terminals of course.
sudo tcpdump -eni tap0 udp port 67 or udp port 68 or arp or icmp
sudo tcpdump -eni wlan0 udp port 67 or udp port 68 or arp or icmp
Also, these commands are useful as well.
watch -n1 route -n
watch -n1 arp -an
If you need to figure out what is going wrong, be sure to stop all the components of the appropriate method and run them in the foreground in separate terminals. e.g. parprouted, bcrelay, dhcp-helper, dhcp3-relay. Most will give you clues as to what is failing.
Now.. I should mention, I ran into all sorts of issues when trying to get all of this to work. The methods that gave me the most trouble were the DHCP relay agents.
I have an Actiontec MI424WR router that royally screws up my DHCP relay agent’s packet exchange. I wasn’t getting any DHCP offers with unicast packets sent to the router. Apparently, during a typical non-relayed DHCP exchange, I was able to see that the router’s source MAC address was completely different in broadcast DHCP offer packets than what it’s IP address is actually associated with, so my unicast packets were probably being dropped by the router. I’m assuming this is some type of internal bridge interface dedicated for DHCP services or something, so I ended up having to install a separate DHCP server for this to work. ISC’s DHCP server worked completely normal, and I suspect this is entirely the routers fault.
Conclusion
If you do want to use this configuration regularly, I recommend the combination of parprouted and bcrelay or dhcp-helper. Both can be run in the background easily, and requires almost zero configuration if traveling between multiple networks.
However, as you have probably gathered, both methods described above are a bit complicated, and I don’t necessarily recommend it for every day use. I did it because I’m a geek, and I wanted to prove it could be done. While the process of setting up the entire environment could be made simpler with scripts, the challenges you will face on each wireless network might make the process of troubleshooting counterproductive. Many of the headaches you will face will be related to the wireless network hardware, such as centralized wireless solutions that restrict the number of MAC to IP addresses in order to prevent MITM attacks, and of course in some cases, charge you appropriately.
The best solution for public hostspots and corporate networks is still good old fashioned NAT.  But this way sure is is a lot of fun and a good way to waste your weekend to impress all your other nerd buddies.

