Posted by admin on December 15, 2009 under Tech Tips | 
Previously, I described how to Extract Audio from Video Files to WAV using Mplayer. Another method using FFmpeg instead of Mplayer was also pointed out in the post titled Add Stereo Audio Tracks to MKV Files, and I figured it would be useful to outline the quick one-step process in a post all by itself.
Here’s an example of extracting the audio from a video file called video.mkv and saving it to a file called audio.wav. This very well could have been an AVI, MPEG, or any other video format that FFmpeg can decode.
ffmpeg -i video.mkv -acodec pcm_s16le -ac 2 audio.wav
It should also be mentioned that your source video file may have multiple audio channels or streams. For example, you may have both English AC3 and DTS channels, but you may also have other audio streams for other languages, directors comments, etc. If you want more control over which stream you are using, first identify them all with ffmpeg.
ffmpeg -i video.mkv

[snipped for brevity]

Input #0, matroska, from 'video.mkv':

Duration: 01:30:38.78, start: 0.000000, bitrate: N/A

Stream #0.0(eng): Video: h264, yuv420p, 1280x720, PAR 1:1 DAR 16:9, 23.98 tbr, 1k tbn, 47.95 tbc

Stream #0.1(eng): Audio: ac3, 48000 Hz, 5.1, s16

Stream #0.2(eng): Subtitle: 0x0000

Stream #0.3(heb): Audio: mp3, 48000 Hz, stereo, s16

Stream #0.4(heb): Subtitle: 0x0000

Stream #0.5: Attachment: 0x0000

Stream #0.6: Attachment: 0x0000

At least one output file must be specified
From the example above, you see that Stream #0.0 is labeled as being an English video stream with h264 encoding. Stream #0.1 and #0.3 are both audio streams, but #0.1 is English AC3 5.1 and #0.3 is Hebrew MP3 stereo. Simply reference the stream id with the -map option in the following format.
ffmpeg -i video.mkv -map 0:1 -acodec pcm_s16le -ac 2 audio.wav

[snipped for brevity]

Output #0, wav, to 'audio.wav':

Stream #0.0(eng): Audio: pcm_s16le, 48000 Hz, stereo, s16, 1536 kb/s

Stream mapping:

Stream #0.1 -> #0.0

[snipped for brevity]
Now that you have a PCM WAV file, you can manipulated it however you like, e.g. encode to MP3, OGG, FLAC, etc.
lame -V0 -q0 --vbr-new audio.wav audio.mp3

oggenc -q6 audio.wav

flac audio.wav
Posted by admin on December 13, 2009 under Tech Tips |
The following outlines the process of dynamically adding a blockquote message at the top of any post you have flagged as being “outdated”. Over time, your posts can become outdated or even completely inaccurate, especially if you’re running a tech blog, since software constantly changes. This will help warn readers that there may be issues with the post in it’s current condition.
I did some digging around and couldn’t find an official plugin that took care of this. I did however stumble across a blog post by Trey Piepmeier that helped me understand a fairly straight forward method of doing it yourself. I typically don’t like to rehash work someone has already discussed, but I figured it would help to give a little more detail for those interested. Depending on your PHP and WordPress theme modification skills, you can change this however you like.
PLEASE MAKE A BACKUP OF YOUR THEME BEFORE CHANGING ANYTHING.
You can place the following PHP “if” condition just BELOW the code referencing your post title and ABOVE the code referencing your post content. The get_post_meta() function assigns the $status variable with the value of a custom field you will later define as “outdated”. If it matches, then a blockquote message will be printed, otherwise it will be skipped and the post will continue as normal.
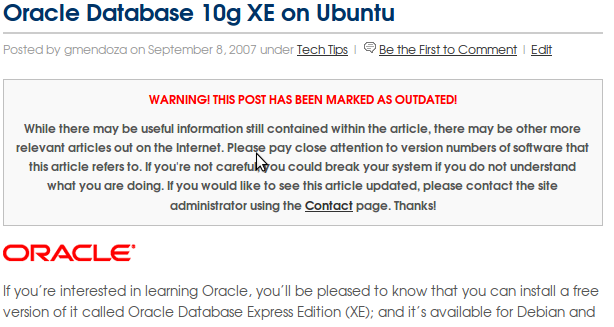
WARNING! THIS POST HAS BEEN MARKED AS OUTDATED!
Enter some useful message here about the article being old.
Depending on your theme, this can typically be done in your themes index.php and single.phpfiles, but you should also update any other you use to publish posts from.
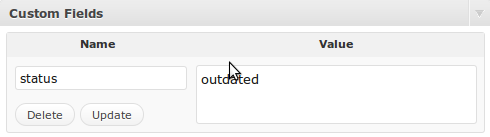
Then, all you need to do is edit any of your outdated posts and add a custom field with the name of “status” and a value of “outdated” without any quotes and your work is complete.
An example of what this might look like on your blog is shown below.
Please feel free to leave comments, suggestions or concerns. A great deal of help on figuring this out was also provided in the #Wordpress IRC channel on irc.freenode.net. If you find yourself in a pickle, there’s always someone there willing to help you out.
Posted by admin on December 9, 2009 under Tech Tips |
If you’re running the Gnome desktop environment and would like to have GnuPG context menu options in Nautilus to encrypt, decrypt, and digitally sign files, simply install the Seahorse plugins package available in your favorite Linux distribution repositories. If using Debian or Ubuntu, it’s as easy as an apt-get install.
sudo apt-get install seahorse-plugins
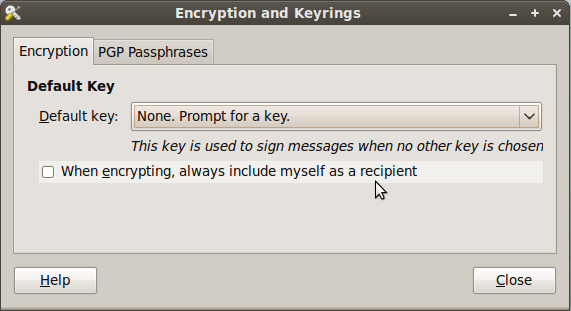
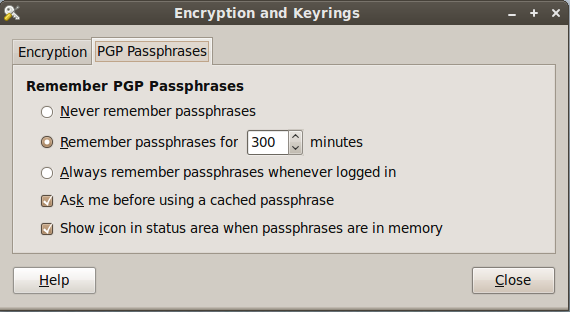
After installing the package, go to System -> Preferences -> Encryption and Keyrings, select a default key to use and decide whether you want to include your own key by default when encrypting files. This is sometimes a good idea if you ever want to open a file you encrypted to someone else. Below are some screenshots of the Seahorse preferences.
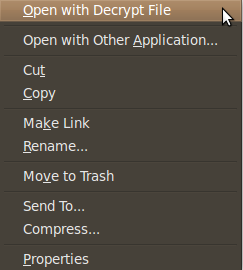
Here are some screen shots of the context menu options that appear when you right click on files in Nautilus.
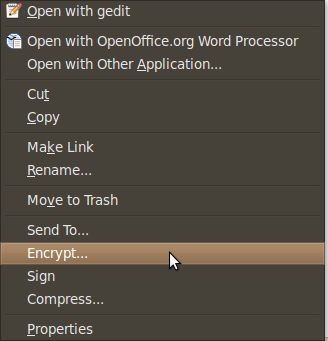
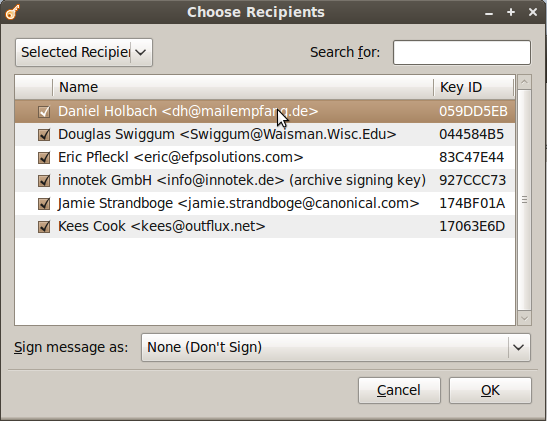
When you choose to encrypt a file, you can select as many public keys as you’d like. Here’s an example of the dialogue.
Using PGP has never been easier. There are still some improvements to the UI I would like to see completed, but overall the most important features are there.
Posted by admin on December 1, 2009 under Tech Tips |
When adding third party software repositories to your APT sources list, you can easily download a referenced PGP key to your APT keyring using the advanced options of the apt-key utility.
For example, if you are adding a third party repository that references the PGP key ID of 6E80C6B7, the following will work as long as the key has been uploaded to a keyserver.
sudo apt-key adv --keyserver keyserver.ubuntu.com --recv-keys 6E80C6B7

gpg: requesting key 6E80C6B7 from hkp server keyserver.ubuntu.com

gpg: key 6E80C6B7: public key "Launchpad PPA for Banshee Team" imported

gpg: no ultimately trusted keys found

gpg: Total number processed: 1

gpg: imported: 1 (RSA: 1)
Typically, instructions on adding repositories give readers a two or three step process that involves apt-key reading a key from a text file or piped from a wget command. The above just cuts all that nonsense out.
The apt-key man page is a bit bare, but there are a few other options you might find interesting that are only mentioned in the commands help output.
apt-key

Usage: apt-key [command] [arguments]
Manage apt's list of trusted keys
apt-key add - add the key contained in ('-' for stdin)

apt-key del - remove the key

apt-key export - output the key

apt-key exportall - output all trusted keys

apt-key update - update keys using the keyring package

apt-key net-update - update keys using the network

apt-key list - list keys

apt-key finger - list fingerprints

apt-key adv - pass advanced options to gpg (download key)
