VirtualBox Wireless Bridging
WARNING! THIS POST HAS BEEN MARKED AS OUTDATED!
While there may be useful information still contained within the article, there may be other more relevant articles out on the Internet. Please pay close attention to version numbers of software that this article refers to. If you’re not careful, you could break your system if you do not understand what you are doing. If you would like to see this article updated, please contact the site administrator using the Contact page. Thanks!
UPDATE (12/13/2009):The latest versions of VirtualBox 3 have made great improvements in their guest networking options. It is possible to natively bridge guests over your hosts wireless connection “out of the box”, even allowing guests bridge over wireless with DHCP. The suggestions on this post still work fairly well, and will be left up as it has bits of information that is still useful in some scenarios. Please refer to the latest VirtualBox documentation for more help.
ORIGINAL: Here’s a straight forward explanation on how to bridge (well, technically route) your VirtualBox (VB) guest network interface through your host machines wireless network connection. The guest machine will be configured to use a static IP address that is on the same subnet as the wireless network, and will also be able to communicate directly with any device on the network.
First things first, make sure you have a working VB installation and that your guest operating system is configured with a static IP address outside of your DHCP scope. You also need to install the User Mode Linux utilities. In Ubuntu/Debian, they are found in the uml-utilities package.
sudo apt-get install uml-utilities
You also need to ensure your /dev/net/tun interface has the appropriate permissions for the vboxusers group. You can set the permissions manually and should modify the udev rules to have them apllied at boot up.
sudo chown root.vboxusers /dev/net/tun

sudo chmod g+rw /dev/net/tun
Add the following line of code to /etc/udev/rules.d/20-names.rules:
KERNEL=="tun", NAME="net/%k", GROUP="vboxusers", MODE="0660"
Verify /dev/net/tun permissions:
ls -l /dev/net/tun

crw-rw---- 1 root vboxusers 10, 200 2008-04-24 16:34 /dev/net/tun
How does this all work?
The magic of this process is achieved through a technique called “Proxy ARP”. This technique allows a router, in this case your Linux host computer, to intercept Layer-2 ARP packets, and forward them through the host computer and into adjacent networks. Long story short, to the external network, your guest computers MAC address is masked behind the host computers MAC address. The IP address of your guests remain unique to the network and all devices on either side of the host can communicate directly with each other.
Network Assumptions:
I’m going to assume we’re using a very simple setup typical to most small networks and wireless routers. Feel free to adjust the following values according to your own requirements.
Wireless Network ID: 192.168.1.0/24
Wireless Network DHCP Range: 192.168.1.2-100
Wireless Network Default Gateway: 192.168.1.1
Host Computer Wireless Interface: wlan0 (change accordingly)
Host Computer IP: Any IP (Doesn’t matter; You can use DHCP or static)
Guest Computer IP: 192.168.1.200 (Static IP outside DHCP range to avoid conflicts)
Guest Computer DNS: Any DNS server
Guest Default Gateway: 192.168.1.1 (Same value that other devices on the network use)
Quick scripts for the impatient:
To bring up the the tap interface and apply appropriate settings. Run them with root privileges.
sudo tunctl -u $USER

sudo sysctl net.ipv4.ip_forward=1

sudo sysctl net.ipv4.conf.wlan0.proxy_arp=1

sudo sysctl net.ipv4.conf.tap0.proxy_arp=1

sudo ip link set tap0 up

sudo route add -host 192.168.1.200 dev tap0
To tear down the interface and configuration.
sudo sysctl net.ipv4.ip_forward=0

sudo sysctl net.ipv4.conf.wlan0.proxy_arp=0

sudo sysctl net.ipv4.conf.tap0.proxy_arp=0

sudo tunctl -d tap0
Explanation of steps:
Create TAP interface on the host computer (tap0):
sudo tunctl -u $USER
The $USER variable typically maps to your own user account. If not, simply replace $USER with the account that will be running your guest machine; typically your own username.
Enable IP forwarding, which turns your host computer into a router.
sudo sysctl net.ipv4.ip_forward=1
Enable proxy ARP on both the TAP and wireless interfaces.
sudo sysctl net.ipv4.conf.wlan0.proxy_arp=1

sudo sysctl net.ipv4.conf.tap0.proxy_arp=1
Enable the TAP interface.
sudo ifconfig tap0 up
Add a static host route that points to your guest computer via the tap0 interface.
sudo route add -host 192.168.1.200 dev tap0
This is required for your host computer to be able to know how to forward packets to your guest. Ultimately, this is what allows the kernels proxy ARP feature to work.
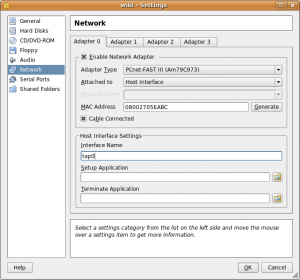
Edit the VB guest network settings so that Adapter 0 is attached to the Host Interface, and that the Interface Name is set to tap0. The screenshot below is an example of such a configuration.
Finally, turn on the guest system, and if you have already configured it’s IP address, you should be able to ping it. The guest should also be able to ping every other device on the network. Provided you have used the correct DNS and default gateway for your network, you will also have internet access available.
Some community documents claim that you need to use an application called parprouted to accomplish this, but that is not the case. Linux has native proxy ARP support, and as demonstrated here, using it couldn’t be easier. Parprouted provides the same service, however it runs as a daemon and adds host routes for every IP involved in a proxy ARP exchange. Depending on the network size, your routing table can become large very quickly. In addition to your increased routing table entries, the service also sends ARP queries to refresh the addresses every 50 seconds, adding senseless clutter to your network as well. While it’s a useful tool for certain applications, you don’t need it if you’re doing light VB bridging.
Full Script Example: tap-setup.sh
Save the following script to somewhere in your path and modify the appropriate values accordingly. You must run the script with root privileges and supply the appropriate start and stop variable to bring up and tear down the TAP interface.
#!/bin/bash
# tap-setup.sh

# Change username accordingly
USER="username_here"

tap_up(){
tunctl -u $USER
sysctl net.ipv4.ip_forward=1
sysctl net.ipv4.conf.wlan0.proxy_arp=1
sysctl net.ipv4.conf.tap0.proxy_arp=1
ip link set tap0 up
route add -host 192.168.1.200 dev tap0
}

tap_down(){
sysctl net.ipv4.ip_forward=0
sysctl net.ipv4.conf.wlan0.proxy_arp=0
sysctl net.ipv4.conf.tap0.proxy_arp=0
tunctl -d tap0
}

if [[ $EUID -ne 0 ]]; then
  echo "This script must be run as root" 1>&2
  exit 1
else

case "$1" in

start)
	tap_up
	;;
stop)
	tap_down
	;;
*)
	echo "Usage: $0 {start|stop}"
	;;
esac

fi

exit 0
|
Multiple Virtual Guest Machines:
More than likely, you will be running more than just one virtual machine. All that is required for this to work is to add an additional static host route for each guest IP address. Add these manually, or simply modify the script to add them for you. Make sure you are choosing IP addresses outside your DHCP address pool to avoid conflicts.
sudo route add -host 192.168.1.200 dev tap0

sudo route add -host 192.168.1.201 dev tap0

sudo route add -host 192.168.1.202 dev tap0

sudo route add -host 192.168.1.203 dev tap0
You can also use a subnet instead of lots of host routes, but you need to be careful in doing so. Adding the entire subnet of your host network (in this case a 24 bit mask) can cause unpredeictable routing behavior. If you know your DHCP pool never extends above the first 100 addresses, you can simply choose to use a smaller subnet matching the higher IP addresses. This way you dedicate these addresses for your guests, and avoid weird routing issues. The following static route example will allow you to use host addresses between .129 and .254.
sudo route add -net 192.168.1.128 netmask 255.255.255.128 dev tap0
Here’s an example of the routing table. Notice that the output is minimal and extremely clean.
route -n

Kernel IP routing table

Destination Gateway Genmask Flags Metric Ref Use Iface

192.168.1.128 0.0.0.0 255.255.255.128 U 0 0 0 tap0

192.168.1.0 0.0.0.0 255.255.255.0 U 0 0 0 wlan0

0.0.0.0 192.168.1.1 0.0.0.0 UG 0 0 0 wlan0
You do NOT have to modify your guest or host subnet masks. Leave them to their respective values. The static route is used simply to help keep your host computer organized and routing appropriately to each side of the network.
Additional FAQ’s:
Q: Does my tap0 interface require it’s own IP address?
A: No. The static route to your guests as shown in the above examples use the tap0 interface as the destination. Packets are simply forwarded out the tap0 interface, and layer-3 information is unaltered.
Q: How does my host computer communicate directly with the guest machine?
A: If your wlan0 interface has an IP address, your host computers routing table will take care of everything for you. You will communicate directly with the guest using the wlan0 IP as the source address.
Q: Does my host computer even require an IP address?
A: No. Your wlan0 interface doesn’t need an IP address for any of this to work. Your host computer won’t be able to communicate directly with anything on the network via layer-3, but will act as a transparent bridge. If you just want your guest on the network, remove all IP addresses and routes from your host, then simply create appropriate static routes for both sides of the host directing traffic out each interface. Using the same strategy of splitting your network in half to avoid DHCP scope conflicts, we add two /25 bit routes, the lower half of the block out wlan0, and the upper half out tap0. You also need a default gateway defined if your guests need internet access.
sudo route add -net 192.168.1.0 netmask 255.255.255.128 dev wlan0

sudo route add -net 192.168.1.128 netmask 255.255.255.128 dev tap0

sudo route add default gw 192.168.1.1
route -n

Kernel IP routing table

Destination Gateway Genmask Flags Metric Ref Use Iface

192.168.1.0 0.0.0.0 255.255.255.128 U 0 0 0 wlan0

192.168.1.128 0.0.0.0 255.255.255.128 U 0 0 0 tap0

0.0.0.0 192.168.1.1 0.0.0.0 UG 0 0 0 wlan0
If you run tcpdump to inspect the magic taking place, you’ll notice ARP exchanges are proxied from a 0.0.0.0 address on your host computer, which is completely acceptable and works well. However, this represents a highly irregular configuration, and if you have multiple host computers doing the same thing you will run into layer-2 issues. Think layer-2 man in the middle attack… but on accident.  This example is simply for educational purposes.
Q: Okay, so I know I don’t need it, but what if I want my tap0 interface to have an IP address?
A: You just want to be careful about the subnet mask you assign to the tap0 interface. I really don’t recommend assigning the same subnet mask as your physical interface, because doing so automatically adds a second route for that subnet, and you can run into routing decision and interface selection issues. I recommend using a 32 bit mask host address.
sudo ip addr add 192.168.1.150/32 dev tap0
This is the cleanest way, because the routing table is only adjusted for that single IP address. Proxy ARP again will work perfectly with that address since the host computer has the route. Also, 32 bit mask address assignments on the host will not show ip in the routing table, so don’t worry if you don’t see it with the route command.
Q: I was messing around with the tunctl commands, and now VirtualBox complains and I can’t start the guest machine.
A: You may have created multiple TAP interfaces inadvertently. If you run “tunctl -u $USER” and the output tells you that it has set a TAP interface with a higher numerical value than tap0 (e.g. tap2, tap3, etc), then you simply need to remove them all, and start over.
sudo tunctl -d tap2

sudo tunctl -d tap1

sudo tunctl -d tap0

sudo tunctl -u $USER
If your tunctl output shows you creating tap0, then you should be good to go.
Set ‘tap0’ persistent and owned by uid 1000
Q: Can I use DHCP on my guest computers?
A: Sure! It is possible, and I will cover this in an upcoming article. You simply need to use a DHCP relay utility that converts your DHCP broadcast messages into unicast messages directed to your networks DHCP server. dhcp3-relay is the tool for the job. However, using DHCP complicates things a bit because now your static route will need to be added dynamically. Now THAT sounds like a job for parprouted! Stay tuned.
