Exchangesyncd is a vital process that allows macOS users to seamlessly synchronize their Exchange emails, contacts, calendars, and tasks with their devices. This functionality is particularly essential for individuals and organizations that rely on Microsoft Exchange servers for email communication and collaboration needs.
How exchangesyncd works
Exchangeіyncd establishes a connection between native macOS applications, including Mail, Calendar, Contacts, and Reminders, and Microsoft Exchange servers. A key element of ExchangeSyncd’s functionality is the ActiveSync protocol, developed by Microsoft. ActiveSync facilitates seamless data transfer, allowing macOS applications and Exchange servers to communicate efficiently. This protocol supports synchronization not only across macOS devices but also on other platforms, including iOS and Android, making уxchangeіyncd a versatile solution for users managing data across multiple devices.
To set up Exchangeіyncd on a Mac, users must input their Exchange server details in the settings of the Mail, Calendar, Contacts, and Reminders applications. This includes entering the server address, username, and password. Once set up, exchangesyncd continuously syncs data between these applications and the Exchange server, ensuring up-to-date information across all connected devices.
Exchangesyncd also supports push notifications, delivering new emails, calendar events, and contact updates in real-time. This ensures users stay informed and on top of their email communication and schedules. By enabling seamless synchronization of email, calendar events, contacts, and tasks, exchangesyncd enhances productivity and efficiency for macOS users relying on Microsoft Exchange servers for collaboration needs.
The alert stating “Ryder will damage your computer” serves as a critical warning linked to a specific ad-generating entity known as Ryder, meticulously engineered to infiltrate Mac systems. As a potent advertising mechanism, Ryder seamlessly integrates with prevalent Mac browsers such as Safari, Chrome, and Firefox, functioning as a browser extension. Its primary operation involves inundating the browser with a diverse spectrum of online advertisements and directing users toward particular sponsored web domains. Recognized as a browser hijacker, Ryder’s invasive actions include altering vital browser configurations, such as the homepage and search engine, coupled with initiating unexpected navigational redirects. These modifications are not merely inconvenient; they significantly amplify the risk of exposure to harmful online material.
The adaptability and tenacity of Ryder, particularly in its compatibility with an extensive array of Mac browsers, are sources of significant concern. Its design allows for a challenging removal process, often possessing the capability to reinstate itself post-initial eradication efforts. This enduring presence signifies an ongoing hazard to the user’s online safety and the overall integrity of the system. The dangers linked to Ryder surpass mere irritation. Although Ryder in itself is not inherently damaging, the advertisements and web domains it endorses could lead users towards more severe threats such as Trojan horses, spyware, or ransomware. Moreover, Ryder’s ability to track browsing patterns and gather personal data introduces grave privacy issues. It has the potential to reroute searches to unverified and possibly malicious sites, thereby endangering personal information and system security.
Confronting the persistent and vexing alerts like “Ryder will damage your computer” necessitates an understanding that these warnings often originate from more profound systemic issues. The designations displayed in these alerts are typically arbitrary and devoid of meaning, with a slim likelihood of corresponding to any readable file on the Mac. This complexity renders the resolution process arduous, as comprehensive searches may fail to produce the expected outcomes.
In the intricate world of macOS, the coreaudiod process plays a pivotal role in managing audio functionalities. However, like many system processes, it can sometimes behave erratically, leading to high CPU and memory usage. This comprehensive article aims to shed light on the intricacies of the coreaudiod process, its association with high CPU consumption, and the steps to address such challenges.
The role of coreaudiod in macOS
The coreaudiod daemon is the backbone of Core Audio, the primary API responsible for all sound functionalities on macOS. Daemons in macOS are background processes, often identifiable by the “d” suffix in their names. While coreaudiod is indispensable for a myriad of tasks, from audio playback to recording, there are instances where it consumes disproportionate memory and CPU resources, leading to system sluggishness.
Factors leading to high CPU usage by coreaudiod
Several underlying issues can cause coreaudiod to consume an excessive amount of CPU:
Absence of Critical Directories
A significant trigger is the disappearance of the /Library/Preferences/Audio/ directory. This directory is paramount for storing user-specific audio settings. If it’s missing, coreaudiod can get trapped in a loop, repeatedly trying to access a non-existent directory, culminating in high CPU usage.
Application Interference
Certain applications might not relinquish audio resources appropriately or prevent sleeping mechanisms in the system, causing coreaudiod to remain active and consume resources unnecessarily.
System Thermal Issues
The coreaudiod process, in conjunction with others like WindowServer, can experience a surge in CPU usage when the system detects potential overheating. This is a protective mechanism to avert hardware damage.
Ensuring safe password practices in an organization can be challenging, but thankfully, there are ways to make complex things easy in this area.
If you are no stranger to Active Directory, then you probably know how important it is to enforce the use of strong passwords across the network. The human element has always been in the crosshairs of cybercriminals who look for shortcuts to infiltrate enterprise environments, with weak authentication undermining the whole security architecture no matter how sophisticated the rest of the defenses are.
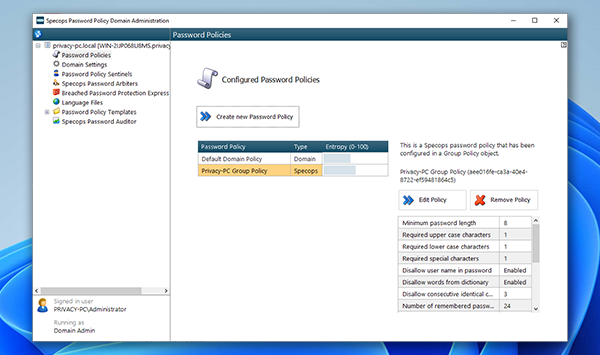
In an ideal world, every user on your team takes password hygiene seriously. In practice, admins can’t leave it to chance. Building your authentication hardening strategy around password policies is certainly the right approach. But what if Active Directory’s default tools don’t suffice or make this process too complicated? A great way to get around these limitations is to use Specops Password Policy, a tried-and-tested toolkit with unparalleled flexibility at its core.
In addition to its user-friendly gist, there’s a handful of other things on the plus side of this solution. I would single out the following advantages:
Turnkey policy templates based on recommendations from Microsoft, NCSC, NIST, and NSA
Custom dictionaries of prohibited passwords
Support for passphrases
Indication of password entropy level
Feature that checks for and disallows passwords found in breach lists
Real-time feedback during password change
Extensive user messaging options (email and SMS)
Password Auditor free feature that pinpoints password-related vulnerabilities
More than 25 languages are available
Volume pricing model
Overall, this software is a terrific choice for companies that seek to enhance their password workflows. Furthermore, it facilitates compliance with increasingly rigid cybersecurity regulations in different industries. Read this Specops Password Policy review to learn how it works, from the installation of its components to the creation of a policy that fits your organization’s context to the fullest.
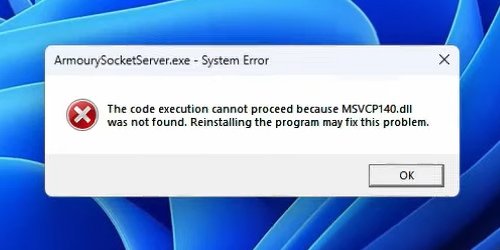
This is a problem you might get while starting a particular program on your Windows computer.
System Error
The code execution cannot proceed because MSVCP140.dll was not found. Reinstalling the program may fix the problem.
This error occurs with the program which is dependent on the MSVCP DLL libraries. MSVCP means Microsoft Visual C++ Redistributable package. It contains different DLL files and if those DLL files are missing then the dependent program will throw this kind of error. In this tutorial you will find different ways to fix MSVCP related DLL errors. It is not only for the MSVCP140.dll but all kinds of MSVCP related DLL errors.
macOS Big Sur and Catalina are massively alerting users to malware on their computers by recurrently displaying “… will damage your computer” pop-up dialogs.
In cybersecurity, the line between a real heads-up and a false positive is blurred. Sometimes the latter is an upshot of over-protection on a service provider’s end, and it can as well be a shortcoming of malware detection algorithms. One way or another, the user is on the receiving end of incessant warnings that make the computing experience go down the drain.
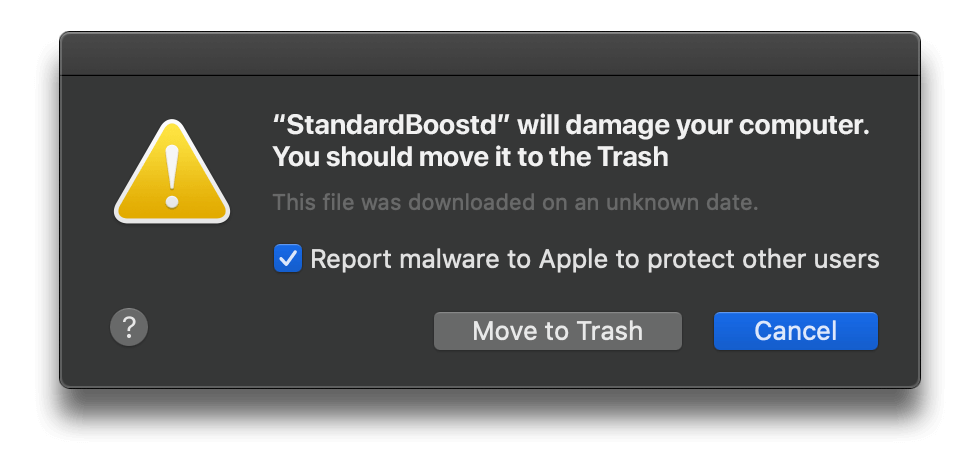
In recent havoc that broke out in the Mac territory, numerous users found themselves in a situation where their machines keep displaying alerts that say, “[App Name] will damage your computer. You should move it to the Trash”. The fact that these pop-ups come in insanely large numbers makes some users think that this is a macOS bug. However, that’s a misconception – and here is why.
The incredibly annoying “… will damage your computer” alerts are triggered because macOS has started ringing the alarm bells in response to real malware activity on specific computers in late February 2021. Notice the vanilla-looking application name in quotes (StandardBoostd) on the screenshot above. This is one of the multiple strains of malicious code invoking an abnormally aggressive reaction of the operating system. Some of the other common samples mentioned in these pop-ups warnings at this point are as follows:
ConfigTyped
DominantPartitiond
ElementaryTyped
ManagerAnalogd
OperativeMachined
ProtocolStatus
TrustedAnalogd
This is far from being a complete list of unwanted apps that have ended up in the spotlight of macOS Gatekeeper, a feature that checks code for notarization issues and known signs of malicious behavior. What most of them have in common is the affiliation with an adware family called AdLoad, which cashes in on freeware bundles to infect Macs on a large scale.
The most rational theory about what’s happening is that Apple’s protection mechanisms have been recently improved, and AdLoad spin-offs along with a few other adware lineages are now easily detectable. These enhancements may have arrived with macOS Big Sur and macOS Catalina feature updates, or the Cupertino company could have quietly rolled out a series of tweaks to Gatekeeper logic beyond the regular update schedule.
That’s good news for the Mac user community, but with the caveat that the “… will damage your computer” alerts are splashing up non-stop without providing any effective methods to apply a permanent fix. Although most of these dialogs include a “Move to Trash” button, it doesn’t do what it says. As a result, users are stuck between a rock and a hard place. On the one hand, they are bombarded by nuisance pop-ups from macOS. On the other, they are faced with stubborn adware that resists commonplace removal.
It appears that the only workaround is to go the extra mile checking a handful of folders for sketchy files and deleting them, or outsourcing this tedious work to a trusted Mac antimalware tool. Hopefully, Apple will be combining its threat detection refinements with hands-on cleaning methods further down to minimize users’ frustration when outbreaks like this occur.
With ransomware in general plummeting so far in 2018, GandCrab is one of the few strains that stay afloat and keep evolving. This infection was apparently coined by skilled cybercrooks as it exhibits a rock-sold crypto functionality, clever distribution and enviable durability in the face of the law enforcement’s efforts to counter the plague. Although it has gone through C2 server takedown by the police earlier this year, it revived with yet more vicious, well-orchestrated attacks.
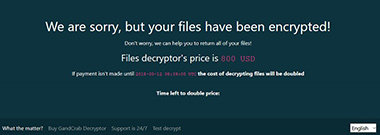
Security researchers spotted a brand new variant of this ransomware in early May. It has reached version 3, and the changes aren’t isolated to the number alone. GandCrab v3 goes equipped with a desktop wallpaper replacement feature similar to how the nasty Locky and Cerber used to instill fear to its victims. The way it handles hostage files, though, remains unaltered – each one is still appended with the .CRAB extension. The ransom note continues to be a document named CRAB-DECRYPT.txt.
The overhauled culprit boasts multi-vector propagation. One of the payload delivery techniques comes down to malspam, where would-be preys receive emails masqueraded as customer support notifications from a bank. These phishing emails contain a ZIP archive attachment that, when unpacked, fires up a VBS downloader behind the scenes. This entity is the one liable for installing GandCrab v3 onto a target host. Another mechanism of infection is based on the Magnitude exploit kit. In this case, all it takes to get contaminated is visit a hacked website with toxic scripts surreptitiously running on it.
The above-mentioned desktop background can be sort of an issue to the attackers. Due to a bug in this routine, the ransomware may lock the user’s screen altogether instead of simply displaying the alert. This may prevent victims from even getting to the point where they learn the ransom demands and possibly decide to pay up. By the way, the extortionists instruct those infected to visit a dedicated payment page via Tor Browser. The size of the ransom indicated on that page is 800 USD, and it’s payable in Dash or Bitcoin cryptocurrency.
Overall, this update of the notorious GandCrab pest has introduced hardly anything revolutionary. However, it is still an extremely dangerous blackmail malware that cannot be decrypted without submitting the ransom.
North Korean government-backed adversaries have executed a series of attacks against high-profile international banks, pilfering millions via fraud schemes.
BeagleBoyz hacking group targeting banks worldwide
A cybercriminal syndicate from North Korea codenamed BeagleBoyz is busy leveraging offensive remote access tools (RATs) and social engineering to steal funds from major financial institutions around the world. In light of this discovery, a number of U.S. Government agencies are alerting banks to the menace.
In a joint advisory issued on August 26, 2020, officials state that the hacking crew is pulling off bank heists over the Internet to fund the totalitarian regime. The threat actors are zeroing in on banks based in well over 30 countries. These shenanigans are reportedly aimed at draining victims’ accounts of a whopping $2 billion.
The startling details were exposed in the aftermath of an ongoing investigation conducted by the FBI, the U.S. Cyber Command, the Cybersecurity and Infrastructure Security Agency (CISA), and the Department of the Treasury.
According to these findings, North Korean state-funded actors have been initiating illegal international money transfers and ATM cash-outs in multiple countries. For instance, just one of these schemes resulted in fraudulent cash withdrawals from ATMs owned by financial entities in dozens of countries, including the U.S.
As if these swindles weren’t enough, BeagleBoyz has been carrying out SWIFT frauds on a large scale, as was the case with the notorious Bangladesh bank heist of 2016 that entailed roughly $80 million in losses. By the way, the attempted amount was about $1 billion. The silver lining in this incident was that the Federal Reserve Bank of New York halted the remaining transfers due to suspicious payment instructions that came from the Bank of Bangladesh.
The BeagleBoyz hacking group is believed to be a branch of the Reconnaissance General Bureau of the North Korean government. Its operations are tracked back to 2014, resulting in hundreds of millions in losses. It is closely tied with the infamous Lazarus Group and APT38, to name a few. This organized cybercrime entity was behind several heists targeting cryptocurrency trading firms and the 2018 fraudulent ATM cash-outs exploiting the FASTCash platform.
DoubleLocker is the first Android ransomware that utilizes the Accessibility Service. Malware may encrypt user data; it can also lock the device.
DoubleLocker is built on the basis of a famous bank Trojan called Svpeng. DoubleLocker uses Svpeng’s code parts to encrypt and lock files but cannot collect user’s bank data and delete accounts.
DoubleLocker can change the device PIN and block the access for the victim. It also encrypts all data. This combination of Android malware features is seen for the first time.
Given the origin of the Svpeng bank malware, DoubleLocker could be turned into what we call ransomware. The malware acts in two stages – it tries to delete the bank or PayPal account and then blocks the data and device to demand a ransom. We found a test version of this ransomware in May 2017.
DoubleLocker is distributed in a very simple way. Like its ancestor the Svpeng banking Trojan, it pretends to be an Adobe Flash Player being pushed on hacked websites.
Once activated, the malware suggests allowing a special feature called Google Play Service. Having received the necessary permissions, the malware uses them to put its hands on administrator rights and becomes the sole launcher app – all without the user’s approval.
Self-promotion as a default launcher increases the persistence of the malware. When the person pushes the Home button, the ransomware is being re-activated and the device gets locked again.
Once launched on the device, DoubleLocker uses several strong arguments to force the user to pay the ransom.
First of all, DoubleLocker changes the device PIN and prevents the user to operate it. A new PIN is selected from a random value. The PIN is not going to be stored on the device. Crooks do send anywhere outside either. So the victim and security professionals cannot recover it. But after receiving the payment, an attacker can remotely reset the PIN and unlock the device.
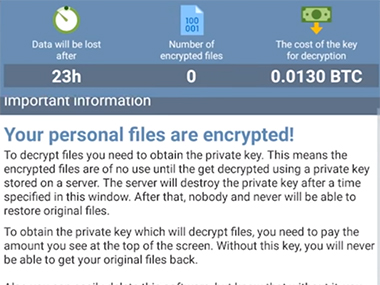
Secondly, DoubleLocker encrypts all files located on the device’s primary storage. It makes use of the strong AES encryption algorithm and adds the strange .cryeye file extension.
The ransom amount is 0.0130 Bitcoins. The ransom note emphasizes that victims should send the payment within 24 hours. If they fail to do so, the data will remain encrypted forever.
The sole way to remove the DoubleLocker is to reset the device to the factory settings. Encrypted files cannot be restored.
For prevention, we recommend that you protect your Android-based devices with high-quality security products and make backups on a regular basis.
Here’s a quick tip on using Mencoder profiles that serve as shortcuts for all of your favorite settings. This can save you a lot of time, especially when your encoding syntax is lengthy and difficult to remember.
Profiles are stored in the mencoder.conf file located in the appropriate place for your operating system. For Linux users, you can create a personalized file in your own home directory, ~/.mplayer/mencoder.conf.
Here’s the syntax you might use on a single-pass XviD project without using profiles.


 The overhauled culprit boasts multi-vector propagation. One of the payload delivery techniques comes down to malspam, where would-be preys receive emails masqueraded as customer support notifications from a bank. These phishing emails contain a ZIP archive attachment that, when unpacked, fires up a VBS downloader behind the scenes. This entity is the one liable for installing GandCrab v3 onto a target host. Another mechanism of infection is based on the Magnitude exploit kit. In this case, all it takes to get contaminated is visit a hacked website with toxic scripts surreptitiously running on it.
 Given the origin of the Svpeng bank malware, DoubleLocker could be turned into what we call ransomware. The malware acts in two stages – it tries to delete the bank or PayPal account and then blocks the data and device to demand a ransom. We found a test version of this ransomware in May 2017.