Posted by admin on July 12, 2008 under Tech Tips | 
There’s a number of MP3 tag editors available for the Linux platform, but there are two I use exclusively. EasyTag by far is the easiest and probably the most popular graphical MP3 tag editors available, and I use it a great deal for a majority of my MP3 tagging and renaming functions. For quickly identifying, converting and stripping unwanted tags, I use a python based command line application called eyeD3.
In my experience, EasyTag is the most versatile tag editor available. Some often wonder why on first launch that all of their tracks are highlighted in red and why it keeps prompting them to save changes that they didn’t make. This is because by default EasyTag writes both v1.1 and v2.4 tags to files it touches, and will attempt to automatically upgrade all v2.3 tags it has scanned. This behavior can be adjusted from “Settings… Preferences… ID3 Tag Settings”. If you have a player that is not compatible with 2.4 tags, then this is the place to change it back to v2.3. Uncheck the “Automatically convert old ID3v2 tag versions” option if you would like to stop that behavior. Personally, I also remove the option to save ID3v1.x tags.

It’s easy to get a bit overwhelmed with all the options EasyTag has to offer, but the defaults are typically safe to use. Here’s a couple screenshots of the main user interface.


Other useful features include the ability to perform bulk file and directory renaming based on the tag data, or even set the tags based on the directory and file naming convention. You can clear all tags (be careful), and automatically populate tags from CDDB sources such as freedb.org, musicbrainz.org, and gnudb.org.
There are also a slew of command line tag editors each with their own strengths and weaknesses. The lack of 2.4 support plagues most of them, with the exception of eyeD3. This application is wicked cool. Not only does it support v2.4 tags but it also provides a very clean display of current tags using color and bold text. You can attach album art, add new or modify existing tags, and of course is easily scriptable.
Posted by admin on March 6, 2008 under Tech Tips |
If you are working on a project requiring that you generate hundreds or thousands of similar but unique text files, you probably will be looking for some type of task automation process. For example, a recent project required that we configure hundreds of Cisco switch configuration files, each being uniquely individualized with IP addresses, OSPF configurations, random passwords, etc. We also needed to configure an import data file for over a thousand DHCP ranges, obviously not something we felt like doing by hand.
For tasks like these, the best tools of the trade are text file templates that represent what the finished product should look like, spreadsheets for basic math and to create import data in the form of CSV’s (comma-separated values), and GNU/Linux shell scripting to pull it all together.
The process can be summarized as follows:
1. Use a template text file and identify the parts you wish to customize with easy to recognize variables.
2. Generate unique data in the CSV format that will serve to populate the template.
3. Run a Linux shell script that performs a search and replace function against the template, and outputs new text files with the values obtained from the CSV file.
In the following example, we will work with a basic Cisco switch configuration file that is condensed for brevity. Notice, we clearly label text within the template that we will use to search for and replace with values obtained from the CSV data. These variables are VAR_HOSTNAME, VAR_IPADDR, VAR_NETMASK, VAR_OSPF_KEY, VAR_TACACS_KEY.
Sample Template: import-template.txt
!
hostname VAR_HOSTNAME
!
interface Vlan100
ip address VAR_IPADDR VAR_NETMASK
ip ospf message-digest-key 1 md5 VAR_OSPF_KEY
!
tacacs-server host 1.1.1.1
tacacs-server key VAR_TACACS_KEY
!
The CSV file in our example is organized as follows:
Field 1=”Host name”, Field 2=”IP address”, Field 3=”Subnet Mask”, Field 4=”OSPF key”, and Field 5=”TACACS key”
Sample Data CSV File: import-data.txt
switch-01,10.1.1.1,255.255.255.0,ospf-key-1,tacacs-key-1
switch-02,10.1.1.2,255.255.255.0,ospf-key-2,tacacs-key-2
switch-03,10.1.1.3,255.255.255.0,ospf-key-3,tacacs-key-3
switch-04,10.1.1.4,255.255.255.0,ospf-key-4,tacacs-key-4
switch-05,10.1.1.5,255.255.255.0,ospf-key-5,tacacs-key-5
Here’s how we pull all of this together using a Linux shell script. First, we define the location of our CSV import file. Next we run a “for loop” that reads the CSV line by line, assigning each data value to a variable name. Lastly, the script concatenates the template, replacing each defined search result with values from the CSV, and sends the output to individualized text files. These text files are appropriately named according the unique value, which in this case is the switches host name.
Import Shell Script: import-script.sh
#!/bin/bash
IMPORT="./data/import-data.txt"
TEMPLATE="./data/import-template.txt"

for i in `cat ${IMPORT}`
do
VAR_HOSTNAME=`echo $i | awk -F, '{print $1}'`
VAR_IPADDR=`echo $i | awk -F, '{print $2}'`
VAR_NETMASK=`echo $i | awk -F, '{print $3}'`
VAR_OSPF_KEY=`echo $i | awk -F, '{print $4}'`
VAR_TACACS_KEY=`echo $i | awk -F, '{print $5}'`
cat $TEMPLATE | sed -e s/VAR_HOSTNAME/$VAR_HOSTNAME/g
-e s/VAR_IPADDR/$VAR_IPADDR/g
-e s/VAR_NETMASK/$VAR_NETMASK/g
-e s/VAR_OSPF_KEY/$VAR_OSPF_KEY/g
-e s/VAR_TACACS_KEY/$VAR_TACACS_KEY/g
| tee ./output/$VAR_HOSTNAME.txt 1>/dev/null
done
|
Step By Step:
To follow along, you can download the above mentioned files, or copy and paste them from the text above. Place the import-data.txt and import-template.txt files in a new directory called “data”, create a directory called “output”, and make the import-script.sh file executable. The final step of course is to run the import script. Here is a step by step to get you going.
wget https://savvyadmin.com/download/import-script/import-script.sh
wget https://savvyadmin.com/download/import-script/import-data.txt
wget https://savvyadmin.com/download/import-script/import-template.txt
mkdir data output
mv ./import-template.txt ./import-data.txt ./data/
chmod 755 ./import-script.sh
./import-script.sh
After you run the script successfully, list the “output” directory to see the newly created files.
ls -l output/
total 20
-rw-r--r-- 1 gmendoza gmendoza 184 2008-03-06 21:33 switch-01.txt
-rw-r--r-- 1 gmendoza gmendoza 184 2008-03-06 21:33 switch-02.txt
-rw-r--r-- 1 gmendoza gmendoza 184 2008-03-06 21:33 switch-03.txt
-rw-r--r-- 1 gmendoza gmendoza 184 2008-03-06 21:33 switch-04.txt
-rw-r--r-- 1 gmendoza gmendoza 184 2008-03-06 21:33 switch-05.txt
The contents of the first file in the example can be viewed as follows. Note that all the variables from the template have been replaced appropriately by the data from the CSV.
cat output/switch-01.txt
!
hostname switch-01
!
interface Vlan100
ip address 10.1.1.1 255.255.255.0
ip ospf message-digest-key 1 md5 ospf-key-1
!
tacacs-server host 1.1.1.1
tacacs-server key tacacs-key-1
!
I certainly hope this gives you some great ideas on how to make effective use of Linux scripts to make large amounts of work into manageable tasks. Comments and questions are welcome.
Posted by admin on January 26, 2008 under Tech Tips |
If you would like to extract the contents of an NT backup (.bkf) file in Linux, mtftar is a utility that translates a Microsoft Tape Format (MTF) stream into the tar format. You can pick up mtftar from the authors site at http://gpl.internetconnection.net.
To get started, download the source code and compile.
$ wget http://gpl.internetconnection.net/files/mtftar.tar.gz
$ tar zxfv mtftar.tar.gz
$ cd mtftar
$ make
$ sudo cp mtftar /usr/bin/
- or -
$ su -c "cp mtftar /usr/bin/"
Using this utility is straight forward, as shown in the following example.
$ mtftar < MyBackup.bkf | tar xvf -
C:
C:/Stuff/Pictures/Misc Family Photos
C:/Stuff/Pictures/Misc Family Photos/First Bikes
C:/Stuff/Pictures/Misc Family Photos/First Bikes/First Bikes 001.jpg
C:/Stuff/Pictures/Misc Family Photos/First Bikes/First Bikes 002.jpg
C:/Stuff/Pictures/Misc Family Photos/First Bikes/First Bikes 003.jpg
C:/Stuff/Pictures/Misc Family Photos/First Bikes/First Bikes 004.jpg
C:/Stuff/Pictures/Misc Family Photos/First Bikes/First Bikes 005.jpg
An alternate mtf reader for Linux can be found here at http://laytongraphics.com/mtf/. The site also references a PDF written by Seagate that describes the MTF format if you’re interested.
Posted by admin on December 30, 2007 under Tech Tips |
If you need to resize and watermark large number of images, there is an easy way to do so using Linux command line tools and a very basic shell script. The easiest and most straight-forward method you can use is through the use of the ImageMagick toolkit. If you don’t have it installed already, you can download it from their site. Most distributions have binaries already built for you. Ubuntu and Debian users can install ImageMagick from the main repositories.
Install ImageMagick
sudo apt-get install imagemagick
Prepare your working environment
Make a directory to store the watermark image (~/Pictures/watermark) and photos you’re working on (~/Pictures/temp). Copy the watermark image and original photos to their respective directories.
mkdir -p ~/Pictures/temp/

mkdir -p ~/Pictures/watermark/

cp /path/to/watermark.jpg ~/Pictures/watermark/

cp /path/to/original-photos/*.jpg ~/Pictures/temp/
ls -l ~/Pictures/watermark/

-rw-r--r-- 1 gmendoza gmendoza 3311 2007-12-30 17:35 watermark.jpg
ls -l ~/Pictures/temp

-rw-r--r-- 1 gmendoza gmendoza 885788 2007-12-30 17:35 ubuntu1.jpg

-rw-r--r-- 1 gmendoza gmendoza 128922 2007-12-30 17:31 ubuntu2.jpg
Change directories to begin working on your photos.
cd ~/Pictures/temp/
Resizing with “convert”
Let’s say you want to specify a maximum width of 440 pixels (height being adjusted proportionally) in order for you to post the images appropriately within the specifications of your website borders. The syntax would be the following:
convert -resize 440 original-image.jpg new-image.jpg
In this example, we will specify the same name for the output files, which will overwrite the original copies.
convert -resize 440 ubuntu1.jpg ubuntu1.jpg

convert -resize 440 ubuntu2.jpg ubuntu2.jpg
Watermark with “composite”
You will probably want to watermark the images after they have been resized, this way there is no distortion of the watermark, and it is appropriately sized. In this example, we will also set the watermark transparency level to 15%, and overwrite the original file again.
composite -gravity northeast -dissolve 15 ../watermark/watermark.jpg

ubuntu1.jpg ubuntu1.jpg

composite -gravity northeast -dissolve 15 ../watermark/watermark.jpg

ubuntu2.jpg ubuntu2.jpg
Your photos will now have a nice watermark in their upper right hand corners.
Automating the process with a script
You can automate these steps and apply them to a large number of files using a script of course. Feel free to download this one and modify it to your liking.
https://savvyadmin.com/downloads/watermark.sh
#!/bin/bash
WATERMARK="$HOME/Pictures/watermark/watermark.jpg"

echo "*****************************************"
echo "* Image Resize and Watermarking Script  *"
echo "* By Gilbert Mendoza -  SavvyAdmin.com! *"
echo "*****************************************"
echo " "

for each in ~/Pictures/temp/*{.jpg,.jpeg,.png}
 do
  echo "Working on "$each" ..."
  convert -resize 440 "$each" "$each" >> /dev/null
  composite -gravity northeast -dissolve 15.3 $WATERMARK "$each" "$each" >> /dev/null
  echo "... Done!"
 done
exit 0
|
Additional Options
Please check out the ImageMagick website for more information on the many options and features their products have to offer.
http://www.imagemagick.org/script/command-line-processing.php
http://www.imagemagick.org/script/command-line-options.php
http://www.imagemagick.org/Usage
Posted by admin on December 25, 2007 under Tech Tips |
The Linux console framebuffer allows you to achieve higher screen resolutions within your Linux console. However, as of this writing, Ubuntu 7.10 Gutsy by default does not load the required kernel modules. By passing the “vga=XXX” kernel option without these modules loaded, you are left with a blinking cursor in the upper-left hand corner of your screen. Here’s how to get the console framebuffer in working order.
1. Ensure the initrd image includes framebuffer support by adding “fbcon” and “vesafb” to /etc/initramfs-tools/modules.
$ echo "vesafb" | sudo tee -a /etc/initramfs-tools/modules
$ echo "fbcon" | sudo tee -a /etc/initramfs-tools/modules
2. Remove (or comment out) “vesafb” from blacklisted modules in /etc/modprobe.d/blacklist-framebuffer.
#blacklist vesafb
3. Add the desired framebuffer variable to the default kernel options section in /boot/grub/menu.lst. For 1024×768, the string should look like the following.
#defoptions=quiet splash vga=791
4. Update GRUB.
$ sudo update-grub
5. If Usplash is configured for a higher resolution than your framebuffer, it will appear off-centered. So adjust /etc/usplash.conf to use the same resolution.
xres=1024
yres=768
6. Update initramfs to rebuild the initrd image.
$ sudo update-initramfs -u
After rebooting, your usplash will appear as normal and you can Ctrl+Alt+F1 to a console after your X environment has finished loading. The text in your console should now appear much smaller and will be much easier to use for large amounts of console work.
Posted by admin on December 2, 2007 under Tech Tips |
If you have a number of audio files that you would like to convert to mp3, but don’t want to hassle with graphical applications, there is a simple way to accomplish the task using Linux, LAME and a little shell scripting. By performing a basic “for loop” to invoke LAME, you can easily convert any group of audio files using one line of shell code.
Here is an example of a “for loop” that runs the command “lame” against a set of files in your current working directory with the .wav file extension.
$ for f in *.wav ; do lame $f ; done
If your audio file names have spaces in them, then you will need to use quotation marks around “$f” variable.
$ for f in *.wav ; do lame "$f" ; done
I typically create my original audio files without the file name extension of .wav or .au. This is because when you run lame against a file name, and do not omit the extension in the output option, the resulting file will have two extensions in the file name. e.g. filename.wav.mp3. Yes, I can use sed or basename in the for loop to prevent this, but to keep it simple, I just choose to not use the file extension to begin with.
If you are working with a group of files that have all been named using the convention of “Artist – Album – ## – Track Title”, (notice the spaces in the name), the following will work.
$ for f in Artist - Album* ; do lame "$f" ; done
Once the job is finished, you will be left with a directory full of your original audio files, and your newly created mp3’s.
Extra Credit
Okay, since we’re on the topic of shell scripting. If you want to delete all the original audio files (the ones without any file name extensions), and without first moving the new mp3’s to a different directory, one overly complicated example would be the following.
for f in *.mp3 ; do AUFILE=`basename "$f" .mp3` ; rm "$AUFILE"; done
This would have been easier if the original files could have been identified with .wav extensions, (rm *.wav), but since they had no file extensions to begin with, a wild card alone would not work. Now folks, this is just an example, and there’s a million other ways you can go about this. But in any case, I hope it helps you start exploring on your own!
Posted by admin on October 8, 2007 under Tech Tips |
Performing GnuPG functions from Vim is actually pretty helpful if you work heavily with both applications on a regular basis. I was recently looking for a simple way to both word wrap and clearsign various text files within Vim, and found just what I was looking for.
1. (optional) Set the word wrap of text in Vim to a maximum text width of 70 characters. This can be done manually, or by simply adding the following text to your “~/.vimrc” file:
:set textwidth=70
2. As for the ability to clearsign, encrypt, decrypt and verify the text from within Vim, you can create command mode aliases as shortcuts for longer commands in Vim. Simply add the following to your “~/.vimrc” file:
:cmap cs %!gpg --clearsign

:cmap es %!gpg -seat

:cmap ee %!gpg -eat

:cmap de %!gpg -d
Once you save the changes to your .vimrc file, open any text file with vim, enter command mode, and type any of the shortcuts mentioned in step two; “cs” to clearsign, “es” to encrypt and sign, “ee” to encrypt with no signature, and “de” to decrypt or verify. The shortcut will display the command about to be issued, to which you can hit can enter to execute it. You will be prompted for recipients, and/or the private key passphrase depending on the function you choose.
If you are familiar with GnuPG syntax, you can change or add any of the above commands to your liking. For instance, for those of you with multiple PGP keys, you can add the “-u”option to specify which one you would like to use.
To wrap an existing unwrapped text file, simply higlight the entire message by placing the Vim cursor at the top of the file, press <shift>+V, followed by <shift>+G. This highlights all text as you will notice. While everything is highlighted, simply press “gq”. This will wrap everything according to your “textwidth” variable.
Feel free to test it out, and provide as much feedback as you like. Have fun.
Special Note:
When using the “textwidth” variable, you may find that it is useful to toggle the paste function. If you are pasting text that has a larger text width than that of which you have specified in Vim (in this case 70 characters), then your paste will automatically be word wrapped to 70.
You may not want this behavior, so the two opposing options you can set manually are:
:set paste

:set nopaste
Better yet, you can map a quick function key to toggle it on or off by adding the following to your .vimrc file:
:set pastetoggle=<F10>
To test, while in insert mode of Vim, press the F10 key, and you will notice that the mode will be clearly identified with:
"-- INSERT (paste) --"
This will allow you to paste text in it’s unwrapped form.
Posted by admin on September 30, 2007 under Tech Tips |
Turing on colored syntax highlighting in Vim can make it easier when looking through complicated text files, scripts, and source code. To quickly turn on or off the feature, use the “syntax” command within Vim:
:syntax on

:syntax off
The results are great. Here’s a screenshot of Vim in color.
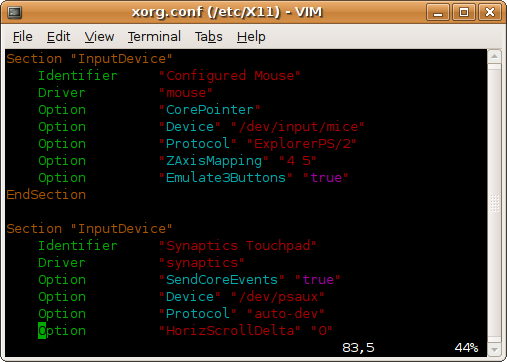
To make the feature permanent, edit the file /etc/vim/vimrc, or as your Vim package maintainer may suggest, /etc/vim/vimrc.local. One can also make the change simply for their user only by editing ~/.vimrc. In all cases, simply add the following line at the end of the file:
:syntax on
Users of Ubuntu by default have vim-tiny, which as it’s name suggests, is a smaller version of the Vim editor. This version does not support syntax highlighting and a number of other features. Of course, remedying this is very easy by installing the full featured vim:
# sudo apt-get install vim
Happy editing.
Posted by admin on September 2, 2007 under Tech Tips |

DenyHosts is a project that adds a protective layer to an SSH server by automatically blocking malicious hosts that use brute force or dictionary attacks. If you have SSH services enabled and accessible from the internet, you will likely have thousands of failed login attempts from several sources within a very short period of time. DenyHosts monitors all login attempts, and based on a customizable rule-set can block hosts from making further connections if an attack pattern is matched.
Using tcp_wrappers, the DenyHosts service elegantly manages entries in the /etc/hosts.deny file, adding and removing hosts when thresholds are crossed. e.g. Three failed logins with unknown user accounts; Three failed logins with root account; Five failed logins with known user accounts; Unblock host after a set period of time; etc. You can also specify whether DenyHosts blocks access to SSH or ALL services, thereby mitigating any other attack vectors the offender might try next.
A most valuable feature that makes DenyHosts even more attractive is the optional centralized reporting system. The service can be configured to report all abusive hosts to the DenyHosts collection server, and automatically import a list of IP addresses that others have reported. This network of intelligence gathering and incident response helps to thwart a large number of attacks before they happen, because the attackers (most of which are automated bots) are blocked before they have a chance to move on to other protected servers.Other useful features include email notification when hosts are blocked, and counter resets after successful authentication to prevent accidental blacklisting caused by fat fingered admins. 
For those of you using Ubuntu 7.04 (Feisty Fawn) and above, it is available in the Universe repository:
sudo apt-get install denyhosts
Edit and customize /etc/denyhosts.conf for your desired options, and restart the service:
sudo /etc/init.d/denyhosts restart
Ubuntu 6.06.1 LTS will need a manual installation, as it is not included in the repositories.
Be sure to check out the project at http://denyhosts.sourceforge.net.
Posted by admin on under Tech Tips |
If you would like to make it easier to visually spot what you are looking for when using “grep”, try out the “–color” flag. This option highlights any matches in the output of your search, giving you an upper hand when trying to visually scan through complicated or cumbersome sequences.
For example, if you were looking for any IP address in your /etc/hosts.deny file that has the number “209” in it, issue the following command:
grep --color 209 /etc/hosts.deny
Here is the comparison of the same output, with and without the color option.


As you can see, one might find it very easy to miss the fact that there are some IP addresses that have multiple octets with the value of 209. The color flag really comes in handy.
UPDATE (12/13/2009): In the most recent versions of Ubuntu, a local alias has been defined in the default .bashrc for each user. This alias gives turns on color highlighting with the following line.
alias grep='grep --color=auto'


